
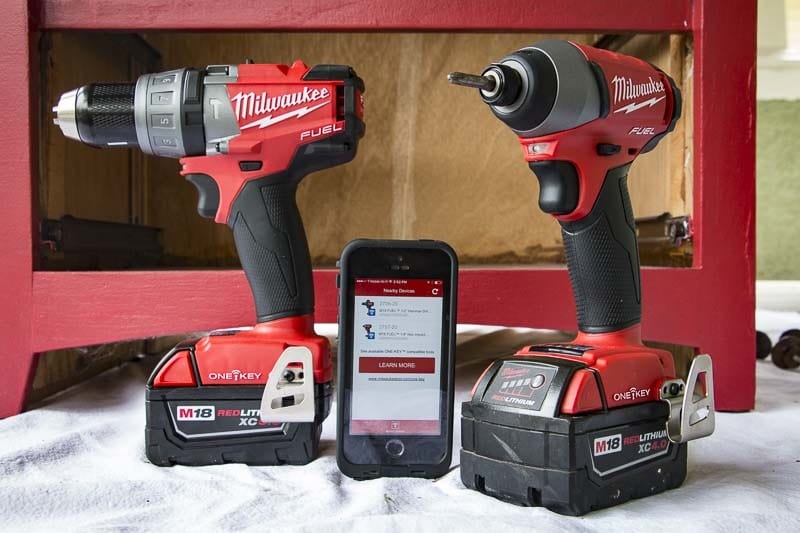
We did some in-depth testing of the latest Milwaukee One-Key hammer drill and impact driver. For the record, the non-One-Key models simply lack the integrated Bluetooth-based tracking and tool control. We’ve already covered the full features of Milwaukee One-Key technology, but this Milwaukee One-Key review focuses on actually using Milwaukee On-Key software hands-on. We provide a bit more detailed look at what it’s like to use the app and software. Not only that, but we also go over as much of the detail and use of it as possible in this Milwaukee One-Key review.
Editor’s Note: If you want to see how well the latest Milwaukee hammer drill and the impact driver performed in terms of speed and torque, check out our best cordless drill and best impact driver reviews.
Setting Up and Using Milwaukee One-Key
Before we get too far in this Milwaukee One-Key review, you have to first download the app and set up an account if you want to follow along. Using Milwaukee One-Key and setting it up isn’t painful. You just download the app and configure it with your name and email. After that, log in and begin connecting to your One-Key compatible tools.
We’re going to save the inventory capabilities of the app and desktop web software for a bit later in this Milwaukee One-Key review because I want to jump right into the most exciting feature for tool addicts: Tool control.
Using Milwaukee One-Key for Tool Control
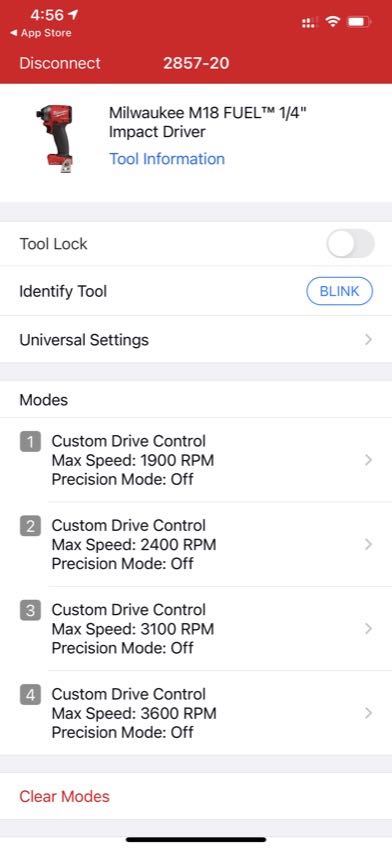
With Milwaukee One-Key tool control, you can custom tune the digital controls of your hammer drills, impact drivers, and more to get them to perform exactly as you’d like. You can connect to your One-Key tools in either of two ways. Once you launch the Milwaukee One-Key app, you can click the Inventory button to show all tools in your inventory.
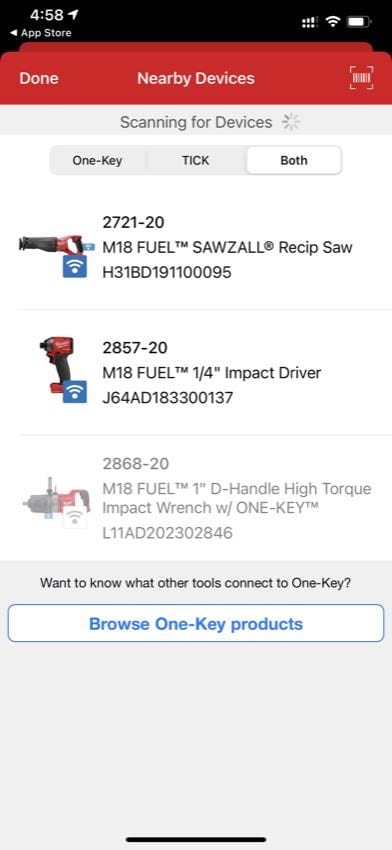
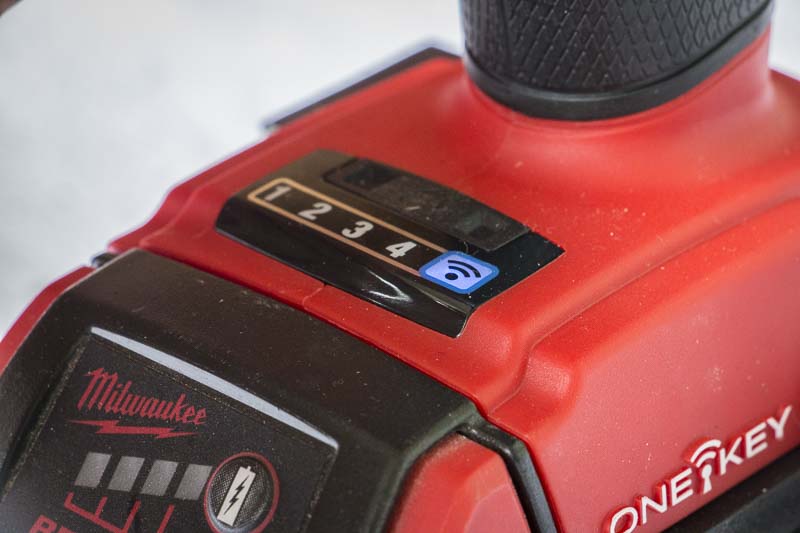
All One-Key-equipped tools within a 100 ft. radius of your smartphone app will have a blue WiFi icon next to the name of the tool. Click the tool to connect to it. If you have a large arsenal of tools, the search feature will help you narrow down the list. The second way to connect is to hit the Nearby Devices button (see further above). This scans the area and lists only devices within a 100 feet area that you can connect to. As with the other method, you simply click on the tool to connect to it. This second method is actually quicker if you want to get directly to the Tool Controls area of the app.
Testing Speed Settings
To understand how we could configure custom speed settings, we set a “PTR Eclectic” mode for our Milwaukee 2706-20 hammer drill, giving Mode 1 a maximum speed of 1000 RPMs in High (2) gear. With our Extech RPM33 laser tachometer we measured about 1006 RPMs. This definitely falls within the margin of error for our testing (1/2 of 1% to be more precise).
In Low (1) gear, which we set to 350 RPMs, the Milwaukee 2706-20 One-Key hammer drill measured 351—about the same accuracy if you estimate the differential to increase with the speed. In these modes, the difference between what I configured to what I measured was truly negligible. Testing the Milwaukee 2757-20 impact driver at the highest speed yielded a slightly different result, with our measured RPMs coming in at 2865 instead of the expected 3000 RPMs at maximum speed (about a 4% difference). Still, setting speed with the One-Key system is something you can do with a reasonable level of confidence.
Storing One-Key Settings
When you store a setting in one of the four available slots, the system lets you know by giving you an onscreen verification. The tool also blinks the WiFi indicator and the number you’re saving to. It follows this with two more flashes to let you know it’s ready for whatever’s next.
Configuring Your Drill to Mix Thinset
One of the things I was eager to do in this Milwaukee One-Key review was to see if I could mimic (or even best) the settings offered by the Hilti SF 10W-A18 4-speed drill. We were impressed that you could finally have a high-torque, low-speed mode for mixing mud, paint, and—of course—thinset. These drills have finally gotten to the point where they have enough torque and electronic motor protection to pull it off without damaging the tool.
For all of these applications, you need Low speed. Do they, however, provide the torque needed to make it work? This is where One-Key gets really advanced. Milwaukee understands the different ways you can use a hammer drill, and they set up their software to customize each. With One-Key, you can set any of the four quick-mode buttons for Custom Drill Control, Custom Drive Control, or Hole Saw. Here’s how those setting options look and how they differ from each other.
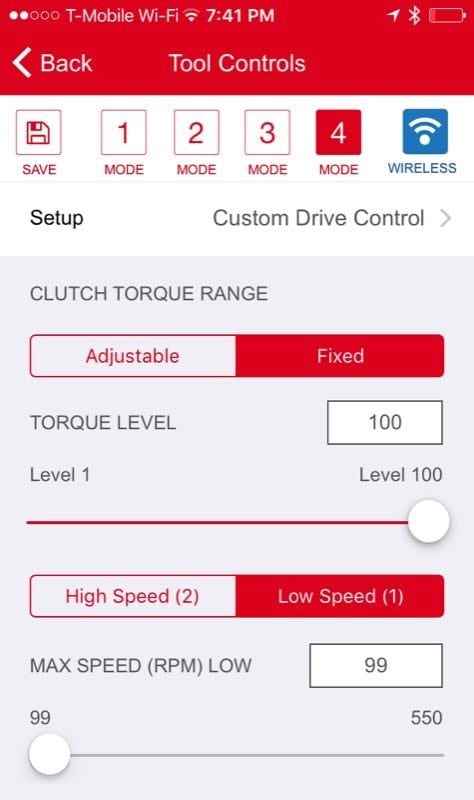
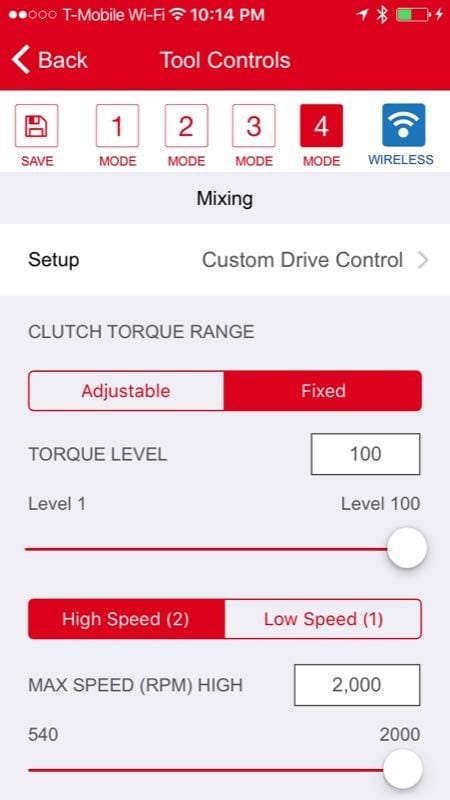
Custom Drive Control
With the Custom Drive Control, you can set either a clutch torque range or a fixed clutch torque for the tool. This lets you adjust what the 1-13 clutch settings actually mean for this particular drive mode. That range can be very wide or very narrow, or you can bypass it entirely. You can also configure maximum speed in both Low and High gear. This gives you even more practical control over the tool in driving applications.
Under the More Options section, you can configure the trigger ramp-up duration (the duration of the tool’s soft start trigger control), LED duration (how long the LED stays on when you tap the trigger), and the LED brightness. You get options for setting the LED light duration between 0–30 seconds. You can even set it so that it’s always on, effectively turning your drill into a mini flashlight should the need arise.
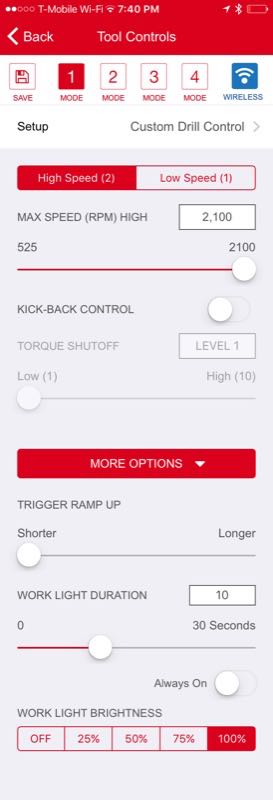
Custom Drill Control
On the Milwaukee 2706-20 hammer drill, the Custom Drill Control preset enables High and Low-speed range settings with Kickback control (and no clutch). Milwaukee One-Key Kickback Control seems to monitor current draw to the motor (as torque) as opposed to using a multi-axis chip to sense whether the tool has actually rotated too far too fast. You set the torque shutoff level anywhere from Low (1) to High (10) with High being the most torque before the tool shuts down. The More Options settings are identical to the ones in Custom Drive Control, and you can configure both the trigger ramp-up duration and LED duration and brightness.
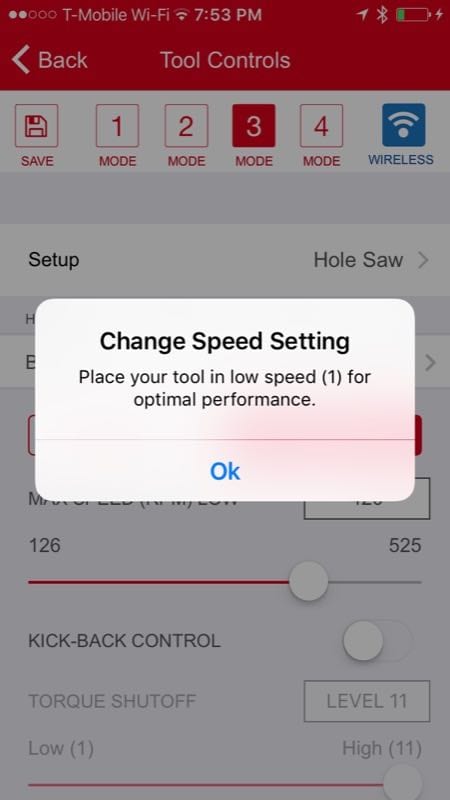
Hole Saw
In the Hole Saw preset area, you get to select both the size of the hole saw and the material. This preconfigures what Milwaukee considers a good starting point for both speed and torque settings. For now, the system presumes the use of a bi-metal hole saw, but we expect to see more options in the future for newer carbide tooth models.
Once you set the hole saw, you can further adjust High and Low-speed range settings with Kickback control that gives you a torque shutoff level. The More Options settings are identical to the prior two preset modes described.
To set up a custom “Mixing” mode in memory slot 4 that would turn my Milwaukee 2706-20 M18 Fuel One-Key hammer drill into the consummate cordless thinset mixer, I set the Low speed (1) gear to max out at 100 RPMs (the slowest it would go) but allowed the tool to use its maximum amount of torque at that speed. But that’s not all. I also configured the same preset so that High speed (2) gave me 2000 RPMs with the same full torque (Level 100). Now I had a truly dynamic Preset that would work for high torque applications in both Low and High speeds. Once finished, I stored my Button 4 setting as “Mixing” and began testing the tool.
Testing the New High-Torque, Low-Speed Mode
We already know how well the Milwaukee Fuel hammer drill works in High-speed full torque mode. I limited my testing to my new Low-speed, high torque setting. Grabbing some thinset and water, I mixed up a quick batch for a small bathroom tile project. Mixing way more thinset than I needed, I wanted to really get a feel for how the drill performed.
There’s definitely a practical and mathematical relationship between speed and torque. If you need more power, you’re going to have to increase your rotational speed. Finding the correct balance is the key. I found the sweet spot somewhere between 100 RPMs and 200 RPMs for my typical applications. I could definitely get enough torque to complete the job. If you’re doing a lot of thinset mixing, a corded drill with a large motor and slow RPM is still a pretty good purchase to avoid making a mess.
Configuring Your Impact Driver for Self-Tapping Screws
In the example above, where we were using the Milwaukee 2706-20 hammer drill, you’ll note that Milwaukee doesn’t include settings for various fasteners, self-tapping screws, or other driving applications. That’s because they know that those settings are best included with the Milwaukee 2757-20 impact driver.
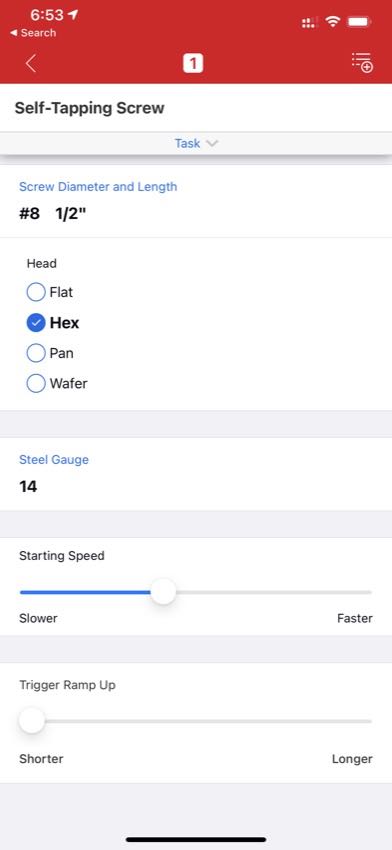
On the Milwaukee 2757-20 impact driver, you get some additional configuration options in the One-Key tool controls. They automatically set ramp-up speed, maximum speed, and finishing speed (the slow-down at the end). Milwaukee does this by letting you choose from concrete anchors (Tapcons or similar) or self-tapping screws (for sheet metal). For the anchors, you can choose the anchor diameter, length, and material you’ll be driving it into. For the self-tapping screws, you select the steel gauge, screw length, diameter, and head. It was interesting to see the instantaneous changes made just based on the head. You’ll note a much slower finishing speed on a slotted head as opposed to a hex head, for example.
It’s clear that a lot of research went into these calculations. Even if they don’t work perfectly for your application (or you don’t see your exact application here just yet), you can certainly get close. From there, it’s just making the adjustments to speed up your workflow. Anyone driving screws into sheetrock, backer board, sheet metal, or fastening large split rings will appreciate the options here.
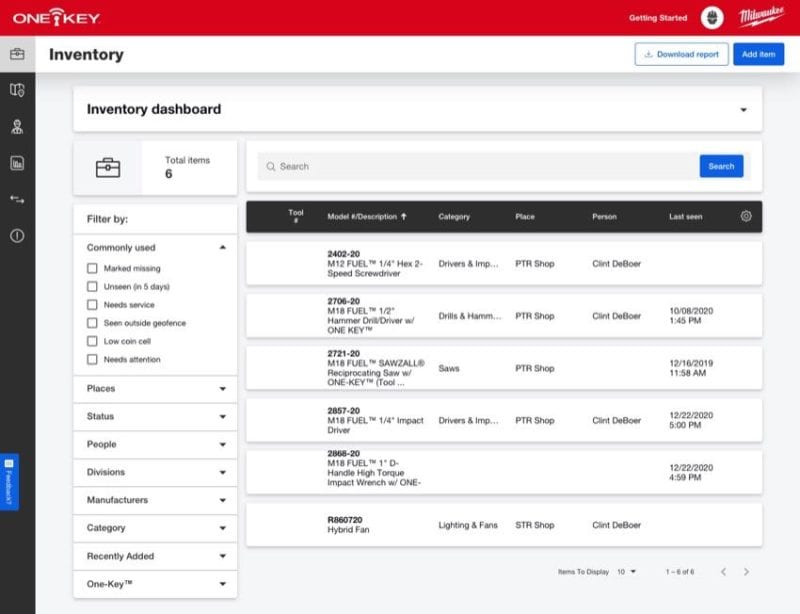
Milwaukee One-Key Inventory System
With Milwaukee One-Key you can not only add Red tools to your inventory but also tools from other manufacturers. That makes this a decent system for tracking what you have as well as which tools are in the tool crib, on a job site, in need of repair, or even missing. You can tag each tool with model and serial numbers, category, location, trade, and person. This lets you use the system for insurance claims as well as getting a location on your tools.
Using Milwaukee Tick tracking devices or Milwaukee Asset ID tags further expands how you can use this system for inventory.

For now, the process of adding new tools works best by importing an Excel spreadsheet of your existing inventory. For new users of tool tracking software, you’ll need to set up your tool crib initially. After that, keep it up to date as you continue to purchase new tools. Milwaukee’s import feature is great for those moving from another platform to this one—particularly if you were doing it by hand before.
Use as a General Inventory Management System
Using this software as a general inventory management system is going to appeal to smaller businesses. They can really take advantage of all the features One-Key offers without having to pay for some of the more sophisticated software available on the market. It also does a great job of managing your warranty materials and receipts. That way, when a tool breaks, you’ve already scanned that in or attached it and don’t have to hunt around for any documentation.
Once your tools are in the system, Milwaukee makes it very easy to sort, assign, and categorize everything. It also lets you quickly update any pertinent information on the tool’s status or whereabouts.
Milwaukee One-Key Bluetooth Tool Tracking
In this Milwaukee One-Key review, tool tracking was a big part of our focus. With this system, you can identify One-Key tools from up to 100 ft away using the app. You can also view the last known location of any One-Key tool. If you misplace or lose the tool, you can initiate an alert to notify you when the tool comes within 100 feet of anyone using the app. An opt-in is required for the app to use location services on the phone. Think of it as a “mesh” platform for tool tracking. Since the tools themselves have embedded Bluetooth chips (and not just the batteries), you can track the tool whether or not it has a battery installed.
Managing and Assigning Tool Inventory
But tracking is more than locating a tool via Bluetooth (though that’s pretty cool). Tool tracking is knowing where a tool is, who it’s with, and why. For that, Milwaukee gives you the ability to manage your inventory and assign tools from one jobsite, person, or trade to another.

You can do all of this most easily from the Inventory screen of the desktop app. Simply filter your list; select the relevant tools; and then edit the Category, Location, Person, Trade, Image, or Status by clicking the corresponding blue button at the top of the screen.
As far as knowing where your tools are (so you can reallocate them), Milwaukee helps you there as well. Anyone running either the desktop application or the app can check on the whereabouts of a tool. This lets you not only track down missing tools but also re-allocate resources based on the tool location. You can identify tools that aren’t being used on a nearby jobsite and send them to another location that needs them. Many companies purchase too much redundant inventory when better tool management will solve the problem.
Milwaukee One-Key App vs Desktop
When considering One-Key, know that it’s best utilized by both the desktop browser and the smartphone app. The desktop web browser software gives you a global view of what’s going on in your company. All of the tools can be located, assigned, and managed across all job sites as well as your tool crib(s). I consider the app the “jobsite” part of the equation. On the job site, you want to use the app. It does just about anything you would want it to do for you while you work.
Conclusion
Milwaukee continues to add more and more tools to One-Key. We won’t be surprised if the majority of the M18 lineup makes it there eventually. The software is easy to use, flexible, handles imports from your existing tool spreadsheets. Best of all—it’s free. You will, obviously, greatly benefit from using One-Key-enabled tools. They give you additional tool tracking capabilities, and adding new tools to your inventory is much quicker.
The only room for improvement I’d like to see is the ability to add low-cost GPS into the tools. This would allow you to have two-stage tracking of all tools. Bluetooth could locate missing tools on the job site. GPS would kick in when the battery was inserted, letting the tool call out its location if reported stolen. Laptop tracking software works similarly when it gets powered up. This would all but eliminate jobsite power tool theft of Milwaukee power tools or anything with a Tick tracking device. As it stands now, once that One-Key tool leaves the proximity of the smartphone app, it’s untraceable.
