
Knowing how to replace a toilet can save you a lot of money. While it can seem like a daunting task, it’s really not all that difficult if you follow a few basic steps and understand the big picture. At some point, nearly every homeowner is faced with some kind of toilet task. That might involve fixing a leak or replacing an entire fixture with a new model.
You might replace a toilet for any reason—from purely cosmetic to replacing a toilet that has cracked or is beyond repair. In either case, the process takes less than an hour if you have everything you need. Double that if you need to run to the store in the middle somewhere because you forgot something.
Sometimes even the Milwaukee Trapsnake can’t save you. At some point, nearly every homeowner is faced with some kind of toilet task. That may involve fixing a leak or replacing an entire fixture with a new model. This can be for any reason. For some, replacements are purely cosmetic while others replace a toilet that has cracked or is beyond repair.
In either case, the process takes less than an hour if you have everything you need. Double that if you need to run to the store in the middle somewhere because you forgot something.
The steps involved in replacing a toilet (which, incidentally match just replacing a leaky wax ring) follow:
Steps in Replacing a Toilet
The steps involved in replacing a toilet (which, incidentally are the same even if you’re just replacing a leaky wax ring) are as follows:
- Disconnect plumbing and drain the water
You want to make sure to shut off the water and drain the tank before starting
- Remove the toilet
Unscrew the two nuts holding the toilet in place, disconnect all hoses, and remove the toilet.
- Preparation for replacement
Prepare the toilet for replacement by checking the (likely plastic) closet flange and test-fitting the toilet (before adding the wax ring). Add the two mounting bolts to the flange.
- Fit the wax ring and place the toilet
Affix the wax ring around the drain hole (yes, this differs from most manufacturer instructions), line up the two mounting holes with the bolts, and place the toilet. Secure it and affix both bolt covers.
- Reconnect plumbing
Reconnect the plumbing line and refill the toilet, checking for leaks.
Expanded Instructions on Replacing a Toilet
The key is to not get hung up on the sheer bulkiness and cumbersome nature of the toilet. 95 percent of the time you are literally following these few steps with no hang-ups. On the occasion that something else is required (like installing an offset toilet flange, for example) then your experience will be a bit more involved.
Let’s start at the beginning with Step 1.
Disconnect Plumbing and Drain the Water
It sounds obvious, but the first step is to turn off the water going to the toilet and drain the water from within the toilet. To accomplish this section, simply follow these steps:
- Turn off the valve which supplies water to the toilet. This should be located below the tank on the left side if you are facing the toilet wall. If, for some reason, you do not have a shut-off valve for the toilet then you’ll need to turn off the water at the main shut-off valve or wherever the nearest cold water shut-off valve is that stops the flow of water to your toilet.
- Flush the toilet. This gets rid of the majority of the water still in the tank. You may want to hold the lever so that all of the possible water exits the tank.
- Use a sponge to soak up any remaining water in the tank and bowl. You can wring out the sponge into a nearby sink or use a plastic bucket.
NOTE: The bowl contains a “trap” meaning that some water may still be in the toilet, even after you have emptied the bowl and tank.
Remove the Toilet

This step involves actually disconnecting and lifting the toilet from its place and removing it completely from the bathroom. To do it right, here are the steps:
- Disconnect the water supply line going to the toilet bowl. Unscrew it from the bowl itself, not the wall. You can typically re-use these lines, however if you do not have a modern braided line or solid pipe, then we recommend replacement at this time. This is not a place you want to come back to later in a leak-repair situation.
- Use an adjustable wrench to remove the nuts from two bolts holding the toilet to the floor. You may have to first remove plastic caps which often cover these bolts. NOTE: If the nuts cannot be removed, either because they are rusted or the bolts are rotating, use a hacksaw to cut off the bolts just below the nuts.
- Remove the toilet and place it outside or on something that can absorb any water that may escape the trap during the move. Typically you’ll want to lay the toilet on its side. Finding a second person to help you carry it is a key part of successfully completing this step without breaking something or violating the third commandment.
Preparation for Replacing a Toilet
In this step, we’ll prepare both the toilet and the closet flange for the replacement toilet. This involves cleaning and prepping the area so that you can replace the new toilet onto the flange with little difficulty. Be sure to follow all of these procedures:
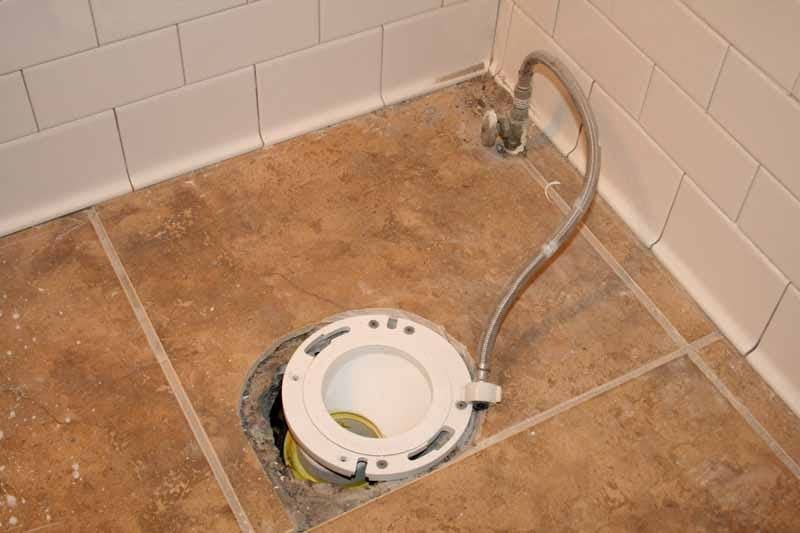
- Remove the old wax ring from the closet flange (the plastic piece that marks and surrounds the location of the toilet drain). This is “messy” work (OK, that’s an understatement) and it may help to have a large screwdriver and wooden paint stick or furring strip to help scrape off the wax.
- Check the condition of the plastic closet flange. If it’s damaged you’ll need to replace it or repair it with kits that are available at your local home improvement store. It is possible that you’ll want to bring in a plumber if the flooring is damaged beyond simple repair or the closet flange isn’t fixable with a standard repair kit.
- At this time some recommend test-fitting the new toilet to the closet flange – without the wax ring. We’ve found this to be helpful for uneven surfaces, though in most cases it’s fine to shim the toilet afterwards.
Fitting the Wax Ring and Place the Toilet
This part is actually very simple, however, we depart slightly from the instructions normally given on the wax ring boxes. The wax ring is what really makes the toilet drain system fool-proof. It guides the sewage into the 3- or 4-inch drain pipe, keeping any waste from escaping the path or leaking onto the floor.
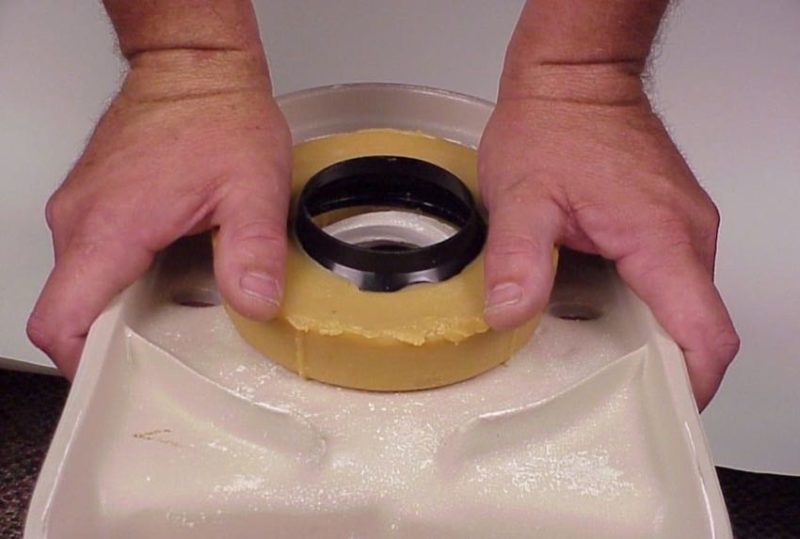
No matter what the condition of your toilet, we’ve found that an oversized ring with a plastic funnel is typically the go-to solution:
- First of all, be sure to use the extra-large wax rings that include a plastic funnel. These are typically adequate for both 3-inch and 4-inch drains. They are simply the best solutions for 99.9% of all toilet requirements we’ve run into.
- Center and place the wax ring over the closet flange. While most instructions tell you to place it onto the toilet directly, we feel there is no need to inconvenience yourself in this way. You can’t set the toilet down afterward unless it’s on its side, for example. It frankly makes it harder to place the toilet perfectly onto the flange.
- Be sure the square head attachment bolts that came with your wax ring are positioned correctly into the closet flange. You’ll be placing the toilet by centering the holes over the protruding bolts.
This Part May Require an Extra Hand
- With a partner (or yourself if you can safely lift and balance the toilet as needed), position the toilet so that the bolts come through the holes in the toilet base. Center the toilet perfectly atop the drain and flange.
- Press down on the toilet with a gentle rocking motion until it seats firmly into place. When pushing down you want to be centered over the closet flange/drain. Use shims if needed to eradicate any rocking of the toilet or to compensate for an uneven surface.
- Tighten the bolts down, alternating sides until the toilet is snug. You do not want to overtighten the bolts as the ceramic toilet base will crack. If the bolts stick up beyond the plastic caps that come with most toilets, use a hacksaw to cut down the bolts so that the caps fit overtop.
- Add silicone caulk around the edge of the toilet to seal it up.
Reconnect the Plumbing
Do just what the heading suggests. Now you can reconnect the supply line, turn the water back on and allow the toilet to fill. Don’t be stingy when it comes to replacing the toilet water supply line. It’s always a good idea to replace that part, even if there are no signs of wear on your existing line. You can select either solid pipes (for a high-end finished look) or metal braided lines that resist bursting.
Finally, when finished, check for any leaks, especially during flushing. That’s all there is to it. Now you can enjoy your new toilet.
