
Off the clock, I love to be on the water, and taking advantage of the diverse fishery Tampa Bay has to offer means I need a quality fish finder. I’ve been using a Garmin unit with good success, but I’ve switched that out for a Humminbird Helix 10 fish finder to see if it can take my electronics game to the next level.
I run an Action Craft flats boat. I’m able to fish skinny where the redfish hang out and can still handle a bit of chop to fish the shipping channels and artificial reefs scattered around the bay. I’ve been using a 9-inch Garmin EchoMap 94sv for a few years. Now I’m working with a Humminbird Helix 10, so it’s an upgrade in size. Both units include mapping, down imaging, and side imaging, but the Humminbird offers some significant upgrades.
Pros
- Easy to learn controls and settings
- Three programmable shortcut buttons
- Improved detail and range on side and down imaging
- Advanced CHIRP sonar
- AutoChart Live mapping ability
- One Boat Network integration with select Minn Kota and Cannon accessories
- Available CoastMaster and LakeMaster chart upgrades to improve versatility
- Forward facing sonar capable
- Ethernet and Bluetooth connectivity
- Additional sizes to match your boat’s needs
Cons
- Outside some anglers’ budgets
Which Humminbird Helix 10 Model is Right For You?
Before we jump into my experience on the water, take a look at what the Helix line offers with the 10-inch screen. There are two versions to choose from, and both are available with or without a transducer. It’s a similar story for the other sizes, though some of the smaller models have options with basic feature sets for those who don’t need all the bells and whistles or are looking for Humminbird quality at a lower price point. Here are the two models in the 10-inch class:
Helix 10 CHIRP Mega DI+ GPS G4N CHO (down imaging)
Helix 10 CHIRP Mega SI+ GPS G4N CHO (down imaging and side imaging)
The main difference is that the more advanced unit has side imaging. Otherwise, the two are nearly identical. If you haven’t tried side imaging yet, I highly recommend you watch a few videos about it and give it a shot. Being able to identify rocks, trees, and even fish that are outside your traditional sonar range makes a big difference in making sure you’re putting your bait where the fish are.
Humminbird Helix 10 Fish Finder Learning Curve
Anytime you switch from one fish finder to another, there’s going to be a learning curve. My Garmin unit was a touch screen, and I knew how to navigate my way around it. I wasn’t sure what to expect by switching to a model that’s completely button controlled instead.
As it turns out, I actually like it better. Humminbird’s layout and menu access is intuitive, and I really like how easy it is to access the screen and main settings to quickly make adjustments. Some of those same settings were tougher to get to on my Garmin.
The three programmable shortcut buttons are a big win. From whatever screen I’m on, I can quickly change to one of those preset views. At the moment, I have full screen 2D sonar, side imaging, and the fishing chart set. If I decide I want something else, all I have to do is navigate to that screen and hold down the button for a few seconds to program it in. The only thing I’d ask for is a few more presets to work with.
There are advantages to a touch screen, though. Tapping on a point of interest on the side scan or typing in GPS coordinates directly into the fish finder is certainly easier. For the way I fish and navigate, I find the Helix control layout to be easier for me overall, even with a couple of tradeoffs.
What I don’t miss in the slightest is accidentally touching the screen and stopping the image or navigating to another screen.
Using the Humminbird Helix 10 Fish Finder on the Water
There’s a lot to talk about with this fish finder. I’ll start by introducing each of the key features and add my impressions after using them on the water.
Dual Spectrum CHIRP Sonar
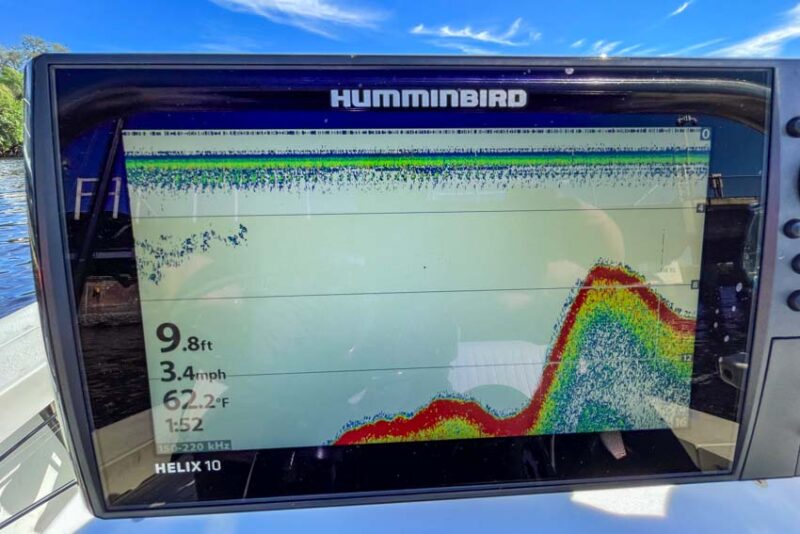
Humminbird’s Low-Q CHIRP transducer offers high-quality dual spectrum modes to target either a wider range or higher detail. Learn more about Humminbird’s advantages in CHIRP technology here.
The purpose of using sonar is to show where the fish are, and some executions of this technology are better than others. Humminbird’s lets me better identify individual fish as well as creating a clearer separation between predator fish and baitfish schools.
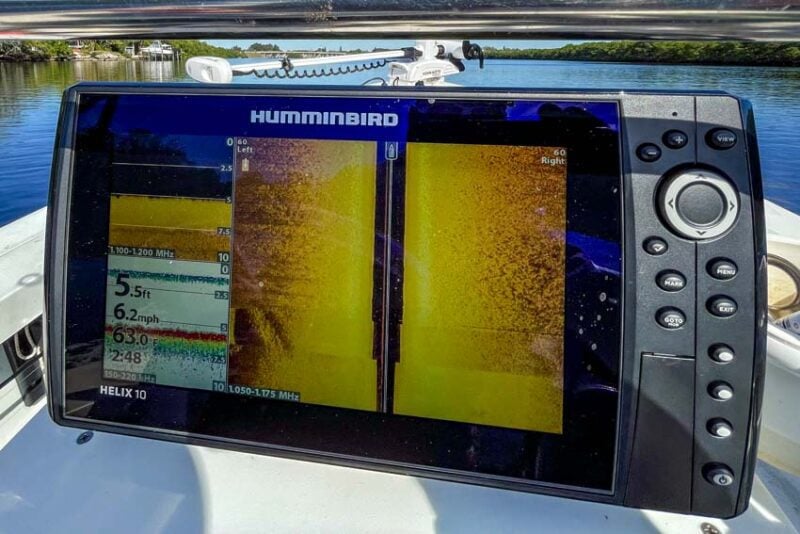
Mega Side Imaging+
The “+” designation on Mega Side Imaging+ is important because it indicates Humminbird’s next-generation technology. Compared to the previous generation, it shows 20% more details and offers 60% greater range.
This is one of the big advantages over my Garmin unit (and previous Humminbird units). The additional level of detail makes it easier to identify the type of structure and see fish around it more clearly. On early side imaging units, it was possible to identify fish if you really knew what you were looking for. With Mega Side Imaging+, it’s much easier. Live FFS imaging still has the advantage, but it’s a big step forward from the previous side imaging generation.
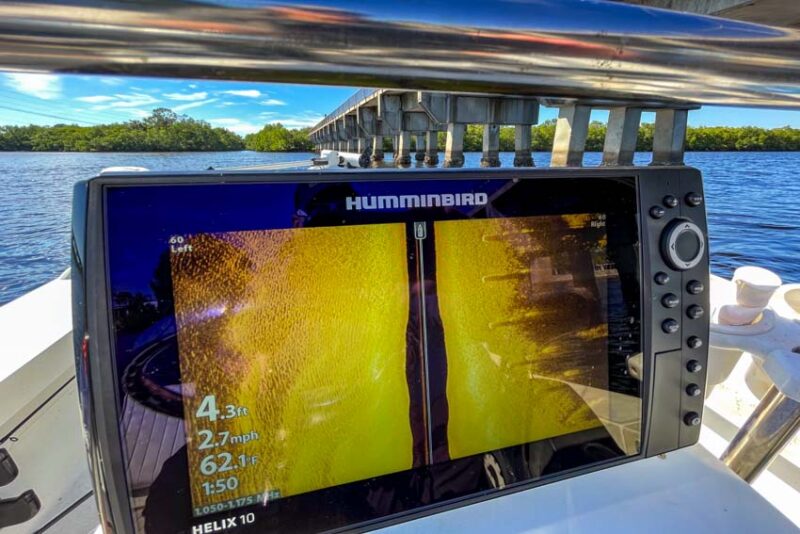
Mega Down Imaging+
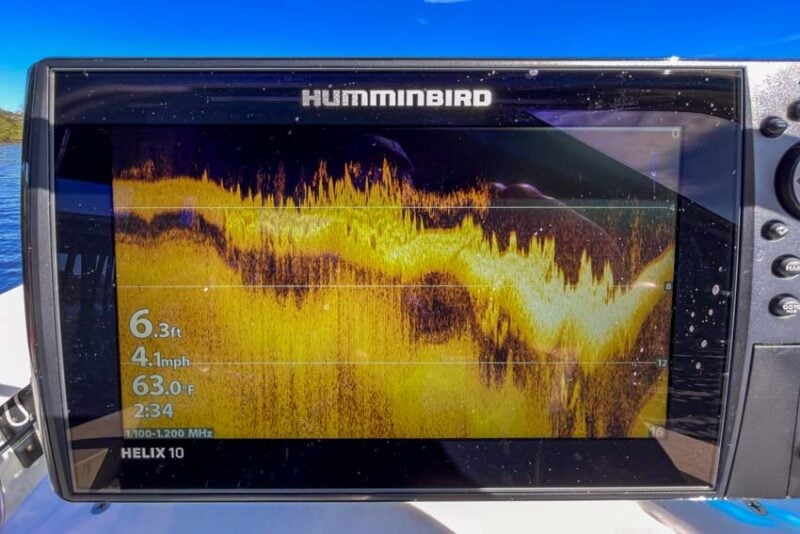
Similar to Mega Side Imaging+, Mega Down Imaging+ gets a 20% detail and 60% range upgrade compared to the previous version.
It’s no surprise that the detail upgrade on Mega Down Imaging+ is just as significant as the side imaging upgrade. The additional detail shows both predator fish and bait fish hiding in and around the structure. You can even see your lure or bait drop as the image scrolls. Again, it’s not the same as live imaging technology, but still a big step forward.
Especially when you’re fishing a structure-packed area such as an artificial reef, the combination of down and side imaging is a one-two punch that lets you spend your time fishing where the fish are. On days when the current is ripping, positioning your bait just 5 or 10 feet away from where the fish are holding can mean the difference between having a shot at a trophy or going home empty-handed.
FFS Capability
I haven’t had the chance to connect Humminbird’s FFS unit, but the Helix 10 and several other Helix models are forward facing sonar capable. Whether you’re a tournament angler, guide, or recreational angler who has the budget for it, FFS is a huge advantage. Its ability to help you efficiently locate and target fish is as game-changing as when side imaging first came out.
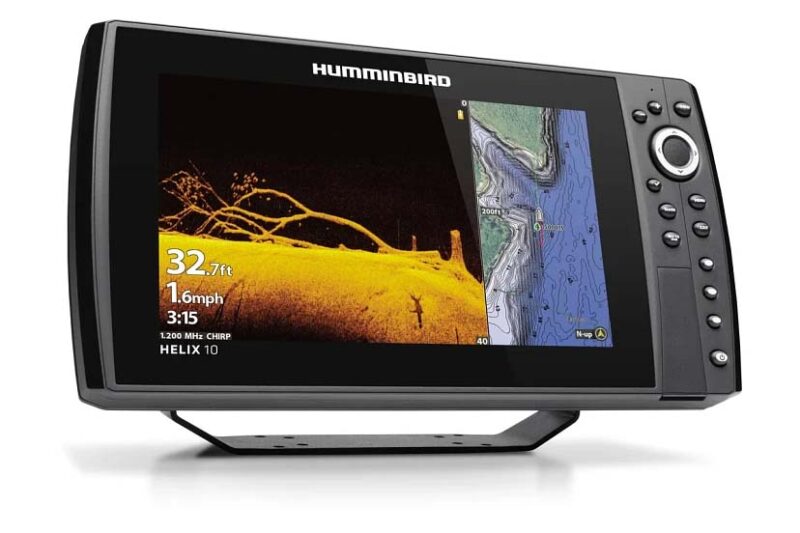
GPS and Humminbird Basemap
Humminbird’s included mapping features include contour charts with docks, marinas, boat ramps, channel markers, and other points of interest.
For many anglers, the basemap that comes on the Humminbird Helix 10 fish finder is all you need. The GPS tracks well and helps us stay in the channel at 1:00 AM when we’re heading back to the ramp after bowfishing for sheepshead. We’re able to maintain awareness of hazards such as markers and obstructions.
When it comes to fishing, you can easily identify where you are in relation to underwater points and ledges, making for an effective on-the-water planning tool. Plus, you can zoom in close enough to get your starting position before letting your imaging and sonar take over.
CoastMaster Chart Upgrade
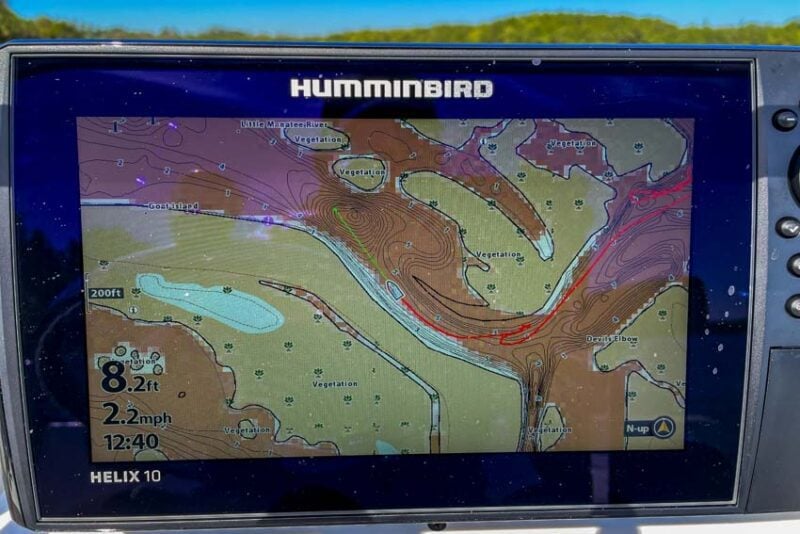
Along with the Helix 10, I loaded the Florida CoastMaster Premium chart. You get additional layers of depth contour details, shaded relief, aerial imaging, and even bottom hardness. There’s tide information along with shallow water highlights, defined depth highlights, depth offset (great for wind-driven tidal adjustments), and a feature that shows how flats will dry as the tide drops.
There’s legitimately helpful information for both inshore and nearshore/offshore anglers. On the inshore side, being able to easily see shallow depths where I might run aground or how the flat is going to dry up in a detailed fashion helps me predict where I’m most likely to find the redfish, snook, and trout I target most often.
Moving nearshore and offshore, the shaded relief is great for identifying depth changes and larger structure that’s not obvious on the charts. Adding in the bottom hardness is a game-changer, helping you eliminate soft bottom areas and target those more likely to be holding grouper, snapper, and hogfish.
AutoChart Live
Auto Chart live is a handy feature you can use if you’re fishing a body of water not included on the base map. If you have access to private lakes and ponds where you fish a lot, it’s a big deal.
If you’re like me and primarily fish tidal areas, it can be helpful to identify contours, holes, and ledges, but because the water level is changing as you’re mapping, be aware that the depths may not be as accurate.
You might be wondering why you would even want to map out coastal areas since they’re all on the base map already. Here in Florida, it’s key, though. When we have hurricanes come through, all that water rushing in and out shifts some of our channels and has even opened new passes. Being able to map those out before the official chart updates come out is a big deal.
One Boat Network
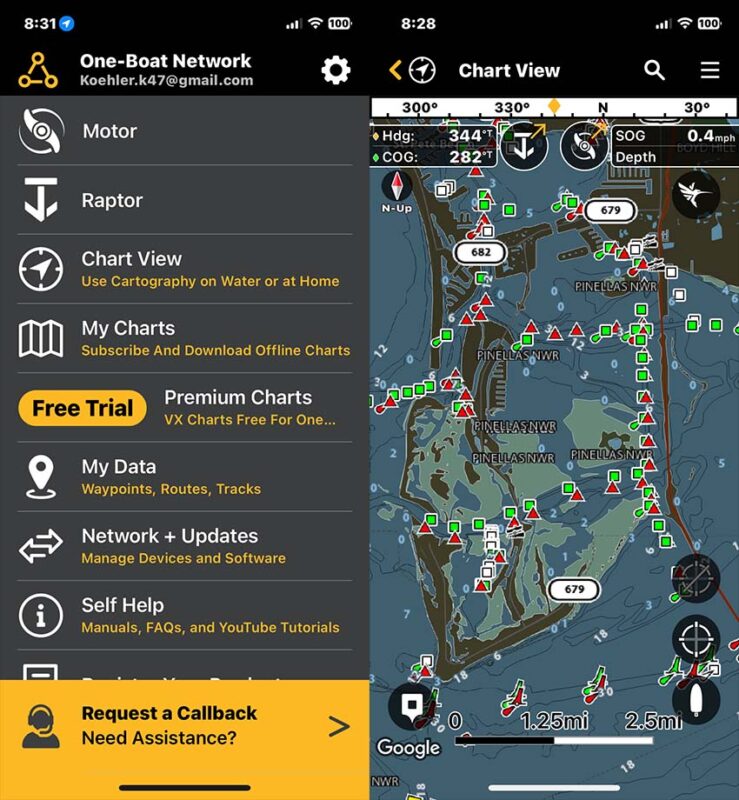
When I saw the One Boat Network launch, I knew it was going to change everything. This networking feature allows select Humminbird fish finders, Talon and Raptor shallow water anchors, Cannon downriggers, and Minn Kota trolling motors to communicate with massive implications.
Sometimes, I’m fishing a rock that’s maybe a few feet in diameter. That’s easy enough to deal with in clear water that’s 5 feet deep. But when it’s 45 feet down in cloudy water, hitting the Spot-Lock button at just the right moment while staring as close as you can to the chart screen is tough, especially when you’re fighting the wind and current. With the One Boat Network, I can let my Helix 10 communicate the exact GPS location I marked to the trolling motor and hold me there with incredible precision.
Another outstanding feature is the ability to follow contour lines. A perfect example is when I’m working the channel ledge is search of grouper and snapper. Instead of simply holding a heading, my Helix can work with my Minn Kota to hold the depth and keep me on the ledge.
Just these two applications completely change how easy it is for me to stay on my target locations. There’s a lot more you can do than just what I’ve described, though. Check out the One Boat Network page to see more!
Additional Highlights
- Ethernet networking for multiple fish finders or add-on tech
- Bluetooth controls to operate Talon or Raptor shallow water anchors and Cannon Optimum downriggers
- Bluetooth connection to you phone for easy software upgrades and notifications through the Humminbird FishSmart app
- NMEA 2000 networking compatible
Humminbird Helix 10 Fish Finder Price
No matter which Helix model you choose, there’s a 2-year warranty on the unit. The Helix 10 CHIRP Mega DI+ GPS G4N CHO (down imaging only) is $1399.99 without a transducer or $1499.99 with it.
The Helix 10 CHIRP Mega SI+ GPS G4N CHO (side imaging and down imaging) is $1799.99 without the transducer or $2099.99 with it.
Other sizes are available from 5 inches to 15 inches and vary in price by size and feature set.
The Bottom Line
There are a lot of professional anglers out there, and I’m not one of them. I’m like the majority of people who get to fish on the weekends and an occasional day off—assuming the weather cooperates. It can be easy to assume that top-tier technology is something only Pros need. However, the Humminbird Helix 10 fish finder helps me locate and stay on fish more effectively, maximizing the time I have on the water. For us weekend warriors, technology that can help us do that is just as important as it is for the guys and gals making their living on the tournament trail.
