
There are essentially 4 parts to a central vac system and installing one is really not as daunting a task as you may think. Most people believe these are very difficult systems you must install before building a home. In truth, retrofitting or learning how to install a central vacuum system after the fact is quite straightforward.
We’ll cover the broad details on the central vacuum installation process in this article. We hope to summarize and simplify the process to help you decide if it’s right for you.
Table of contents
Advantages of Installing a Central Vacuum System
There are several advantages of a central vacuum system. For one, a central vacuum system can be healthier because it doesn’t emit air back into the home as a standalone model does. Instead, the main portion of the vacuum, the canister that handles the actual vacuuming and filtering, resides in a garage or other remote location.
Components of a Central Vacuum System
For installers and consumers new to the category, here are the foundational parts of a central vacuum system. Every system has some form of these parts which makes the central vacuum system work.
Power Unit or Canister/Filter System
This is the actual machine that contains the vacuum motor and housing to suck and store dirt for removal. The vacuum motor uses the home’s electrical system (typically a single 120V/20A circuit). It typically contains filters and noise suppression to allow it to operate in a garage or other centralized area of the home.

All of the piping in the home comes back to the power unit or canister. This is also where the bulk of the cost goes for a standard system in small and medium-sized homes.
Most of these systems use bags versus the more common cyclonic systems found on standalone vacuum cleaners. The reason for this is simple. First, a bag system provides easier and more efficient filtration. Second, it keeps dangerous dust and dirt particles from the motor, prolonging the life of the central vacuum system. The big advantage a cyclonic system has is that it doesn’t require bags and maintains suction longer. Typically, however, cyclonic systems require outdoor venting.
PVC Piping for Airflow
Before you can use a central vac, you’ll need to run PVC piping throughout the home. This lets the vacuum pull dirt and debris all the way through into the central canister/power unit.
As you’d imagine, you’ll want to use wide sweeping turns at all places where a 90-degree bend is needed. Tight radius’ yield a clog point, and you don’t want those. Where possible, we recommend a layout using a series of 45 degree bends rather than 90-degree bends to get everything back to the main line.
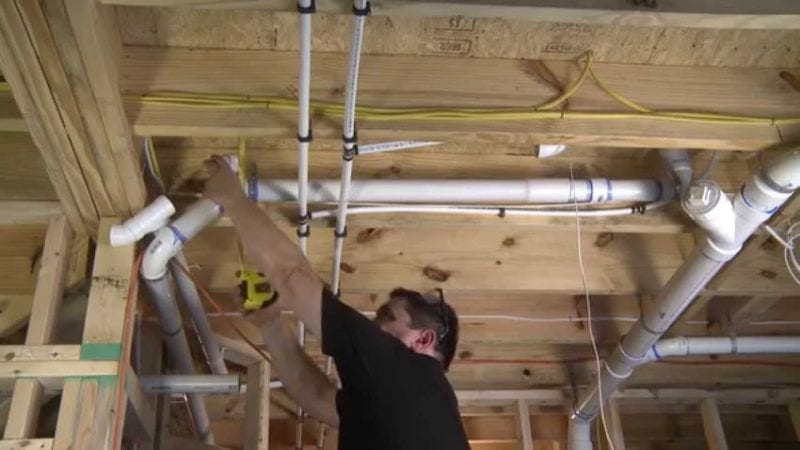
Along with the piping, you’ll typically run high and/or low voltage wiring depending upon your system. For powerheads, you can either plug them into the wall or use advanced systems that integrate 120V power drops into the inlet plate.
Inlets, or Inlet Wall Plates
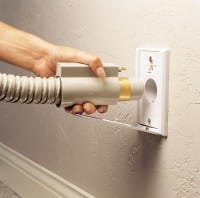
Inlets are important because they are the point of contact for your central vac system. This is the place where you connect your power brush and do the work of vacuuming. This is the place that serves as the contact point for activating the system and beginning the process of dirt removal. Typically, the inlet is installed in interior wall cavities and serves as the point of interface between the piping and the power brush hose.
A single inlet can usually cover anywhere from 600 to 900 square feet of living space. That’s a room that’s an area about 30′ x 30′ in size. Inlets can be mounted in baseboards or at the same height as electrical outlets (approximately 18 inches). Inlets can include 120V AC power “electrified” or only low voltage cable “air-only” to activate the central vacuum system when it detects the presence of a hose. Planning for inlets is important. You don’t want to create a situation where you have to buy extra long hoses because placement was poor and you can’t reach the room corners using standard hose lengths.
If you do opt for electrified inlets, we recommend (and consult your local building codes) mounting them at electric outlet height. We prefer that over baseboard level. You can buy central vacuum inlets as new construction or aftermarket solutions. They can also be equipped for newer drywall applications as well as for use with lathe and plaster.
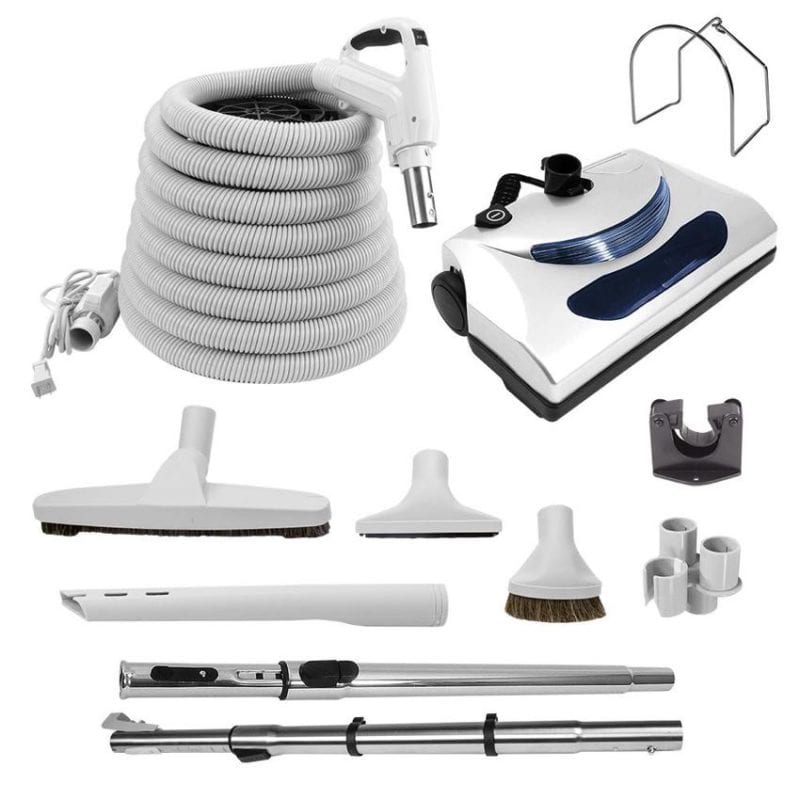
Power Brushes, Hoses, and Accessories
A good power brush and hose will last you forever. They simply connect to the inlet and, through a low voltage trigger, will turn on the central vac system to provide suction. You can find hoses in 30-foot lengths (remember that 900 square foot number earlier?). You can also locate longer lengths when needed. The idea is to place your inlets intelligently so you aren’t looking to string hoses together to reach all your areas.
For those with 2-story houses, it’s recommended to get a duplicate set of power brushes and hoses for simplicity and to avoid having to drag the larger tools up and down the stairs. Remember that if you have an electrified inlet, then your power brush simply plugs in and you have everything you need. With an “air-only” inlet, you’ll need to also plug into a standard electrical outlet. You can get brushes to handle nearly any task—from vacuuming floors, to cleaning upholstery, or giving rover a good vac-down. There are also endless accessories that facilitate the cleaning of stairs, ceiling fans, and more.
Steps to Install a Central Vacuum System (Overview)
General Tools and Supplies Needed
- Tape measure
- Pencil
- Electrical tape and cable ties
- Pipe cutter, cordless reciprocating saw, or hacksaw
- Cordless drill
- Screwdriver(s)
- Wood-boring bit (2-1/2 in.)
- Hammer
- Stud finder
- Hole saw (2-1/2 in.)
- Utility knife
- Wire strippers
- Miter saw
Vacuum Line Supplies Needed
We cover planning below. That sets you up with the amount of PVC piping, elbows, inlet valves, etc you need. Every home is different, but they all follow the same basic idea and workflow.
- Inlet valve kits or faceplates
- Vacuum tubing
- Mounting Brackets
- Short 90-degree elbows (2″ PVC)
- 90-degree sweep elbows (2″ PVC)
- 45-degree elbows
- Sweep T’s
- Stop couplers
- Pipe straps
- PVC primer and glue
- Cable ties
- Low voltage wire
Plan Your Central Vacuuming Layout
Begin by planning your central vacuuming layout. You want the main PVC vacuum line to run through the center of the home (either under the subfloor, via a crawl space, or within an attic). Off that, you will run “trunk lines” that terminate at your inlets. Beware of situations like running the PVC next to a chimney or anywhere it might encounter condensation. In those cases, you may need to switch to a metal product or use insulation.
A single inlet should serve only 800 square feet at the most. More than that and you won’t be able to use standard hose lengths to reach the areas. We recommend running the trunk lines through interior walls whenever possible so you don’t have to feed 2-inch PVC through exterior wall insulation.
For two-story designs, we highly recommend you hire a professional as it present significant complications.
Install the Central Power Unit
Install either a paper bag filtered or cyclonic system in your garage, basement, utility room, or laundry room. If you happen to be using a true cyclonic system, be sure it can properly vent to the outside of the home. Keep in mind that you need to be able to quickly and easily empty the unit and access the filters. You also need to supply power to the central vacuum, so locate it within 6-feet of an appropriate outlet.
Placement shouldn’t prove difficult, but take care that you think it through. Remember to ensure you have enough current available on the outlet to supply power to the system. Many of these central vacuums require as much as 15 amps to operate.
Install Your PVC Tubing and Inlet Valves
It goes without saying that running the PVC tubing might be easier or more difficult depending upon your home. Easy access to a large attic or crawl space simplifies things greatly. Needing to go through block walls or deal with areas subject to freezing present some difficulties.
Make good use of closets to “hide” piping that goes to the floor, bypassing any hard-to-locate sill plates. These often provide the easiest solutions when coming from either above or below. Floor valves also help remove difficulty when retrofitting inlet valves and installing central vacuum systems on existing, older homes.
Running Low Voltage Wiring
You actually want to run your low-voltage wire alongside your PVC. You can mirror the branching of each inlet run from the main trunk by splicing your low voltage wiring to a main line using wire nuts or connectors. Secure the low voltage wiring to the PVC using cable ties to hold them in place and keep them easy to re-locate if needed.
Use a system such as different colored wires to remember and maintain the proper polarity along the entire run.
Check Your Work!
Before you close everything up, be sure to make sure the system functions properly. That means “pressure-testing” it. You can do this by briefly running it with all inlet doors closed to observe the amount of exhaust (there should be little to none).
You can also walk the house while the system is being tested to listen for any obvious leaks. That may indicate you forgot to glue up a section of PVC.
Conclusion
While this by no means walks you through every little detail to installing a central vacuum system in your new or existing home, we hope it proves helpful. Consult an electrician if you need help with the wiring. As always, we recommend the use of a professional if any of this seems too difficult to tackle by yourself. Still, installing a central vacuum system remains one of those projects that yield lasting benefits.
Many people shy away from a central vacuum system, thinking them too difficult to install or too complex. We take a different view. If you think that drilling some holes in your interior wall headers, dropping some power, and running PVC isn’t too big of a project—you may find that installing a basic central vacuum system is literally a couple of days of work. When in doubt, grab a licensed contractor, but this is the type of project you might be surprised to find is easier than you think.
