
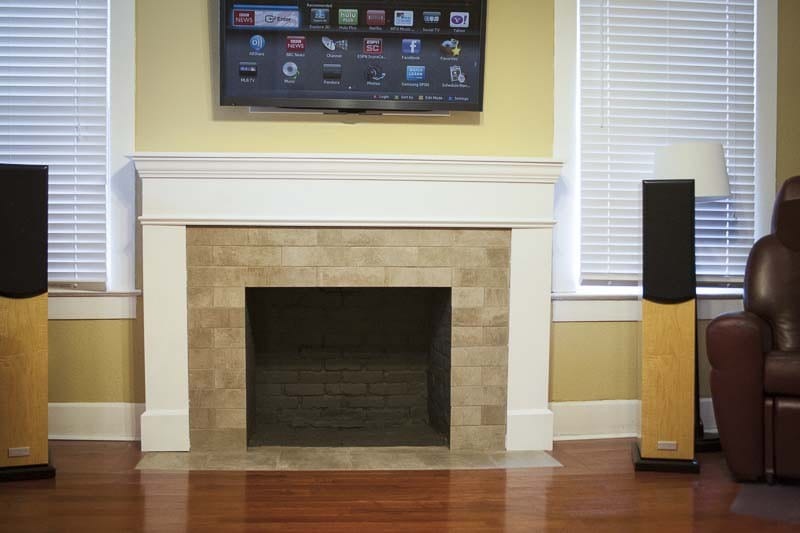
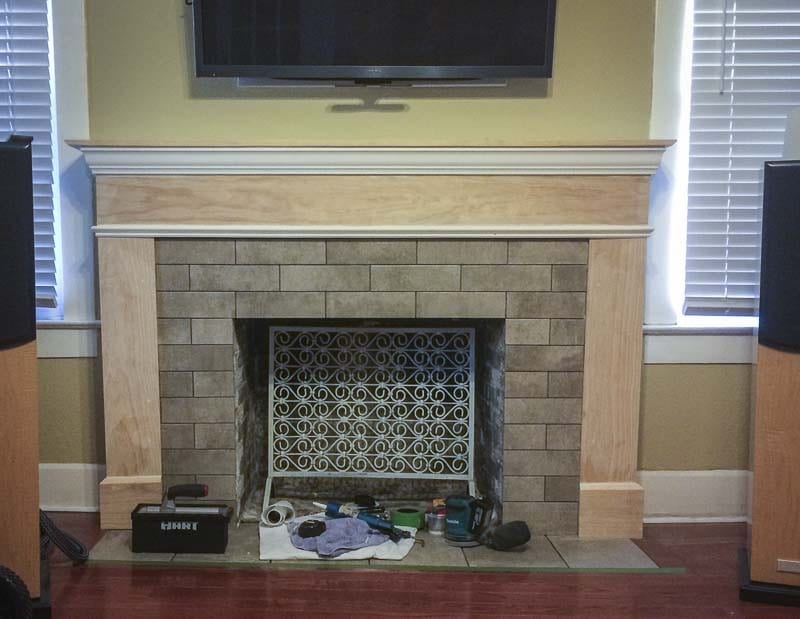
I love my old craftsman-style house. It was built in 1923, and it has such an abundance of character and charm. It’s fun to restore and renovate, simply because you get to unveil and experience some of the old-world charm that seemed so natural for those older homes. One area of these old houses that never seems to do well, however, are the fireplaces. Mine used the old style of common brick that used an unusually deep V-groove pattern. I can’t tell if this brick was specially formulated to serve as a backer for stucco, or if it was simply a local style, but it wasn’t attractive. I wanted to figure out how to tile over a brick fireplace to dress up the home with a new look.
The current fireplace had textured brick that leaned forward slightly. At the top, it cantilevered out in three places (via brick) to support the rather plain mantel. It may have worked in the 1920s, but to me, it just looked rough.
Table of contents
Tiling Over a Brick Fireplace Starts With Demo
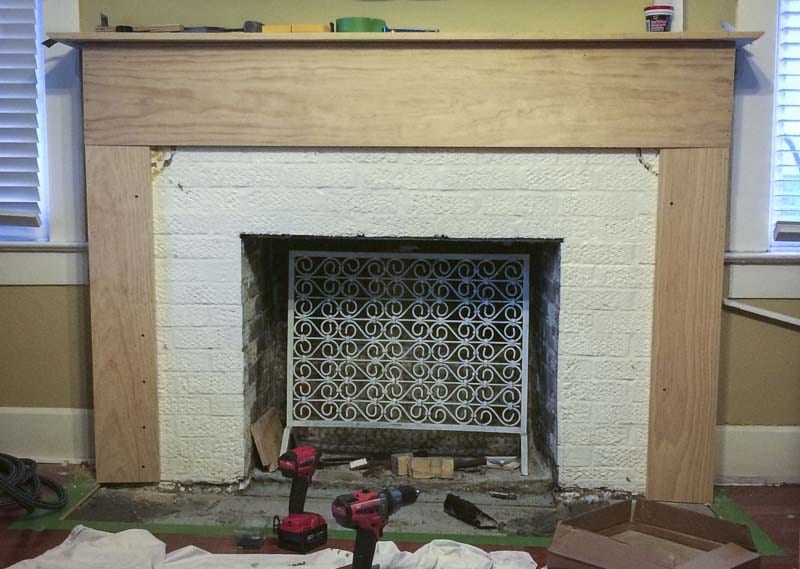
I didn’t want to do a lot of demo work, but I didn’t have much of a choice if I was going to tile over brick. The top of the fireplace, just under the mantel, pushed too far forward to achieve the look I wanted. I wanted a flat front with a simple piece of mitered crown trim underneath the mantel. To accomplish this I needed to break out some of the existing brick. It didn’t take long until I realized, with some consultation from my friend and master trim carpenter, David Delk, that I really needed to take off the entire top of the existing fireplace and rebuild it.
When you’re dealing with brick, silica dust control is a big deal. In order to control it, I recommend using one of the many dust control shrouds available on the market. They work with both angle grinders and saws. Properly connected to your best dust extractor, they control debris and material from absolutely covering your home. Get this right and you’ll save yourself, and/or your client, a lot of hassle later.
We used a DeWalt DWV012 10 Gallon HEPA dust extractor on this job, and it was a great solution. You may also need the use of a cold chisel and hammer to get to some areas. Just try and control the dust as best as possible when using hand tools. Also remember to cover the floor with at least two layers of thick drop cloth. Debris can fly as far as 6-10 feet—and brick isn’t friendly when it hits a wood floor or gets trampled underfoot. We also love ZipWall ZipDoor kits for isolating rooms.
Framing in the New Mantel
Once I removed the top of the fireplace, I rebuilt the framing for the mantel using pressure-treated lumber. The mantel secured to the brick via construction adhesive as well as Blue Tapcons. These anchored easily into the existing brick located just behind. I didn’t have to worry about anything other than structure, however, since I’d be adding 3/4” wood over the entire fireplace. This not only covered the brick, but it also provided makeshift supports all the way up to the mantel.

Shopping List for Putting Tile Over a Brick Fireplace
We opted to grab out materials from the local Lowe’s home improvement warehouse. It had everything we needed to get up and running. Our shopping list included:
- Top Choice pine (a single 1x12x8, and three 1x8x8 boards)
- Crown molding
- Chair rail trim
- Tapcon screws
- Construction adhesive
- Trim boards
- Caulk
- Tile
- Thinset
- Grout
- Paint and primer
All told, we spent approximately $350 in materials for this project including paint. It’s important to think through your materials before beginning a project. We like Lowe’s because their website lets us build our project virtually. You can add products and materials to “Lists” for later retrieval and ordering. After you figure it all out, just place the order and have the store pull all your materials for you.
Refacing the Front of the Fireplace with Wood
The next step in my fireplace resurface and remodel involved covering that brick with 3/4” wood. At first, I wanted to use poplar. Poplar is a great knot-free material that paints easily and cuts and sands well. I was very surprised, however, to find that Home Depot had some excellent (unbelievable, really) Grade A pine boards that didn’t have a single knot! Normally, I’d never consider pine, but the cost savings was too great. I voraciously grabbed a 1x12x8 and three 1x8x8 boards to complete my project. I’d ultimately be painting all of this wood white. So—with a little care—the pine would be indistinguishable from my original poplar design.
I cut these boards with a Makita 8-1/2” sliding miter saw, placing the shortened 1x12x8 across the top of the fireplace. It would sit just under the mantel. On the left and right, I had vertically oriented wood that I cut from 1x8x8 boards. These 1x8x8 side boards ran all the way from the floor to the mantel—just over 4 feet in length. The remaining wood served as material for custom trim boards. They would carry through my baseboard molding across the base of the fireplace.
Securing the Wood to the Brick
I secured the wood to the brick using construction adhesive and 2-1/4” Tapcons. I pre-drilled these and drove them using a Milwaukee M18 FUEL impact driver. For the 1×12 at the top of the fireplace, I used construction adhesive and also finish nails to secure it to the pressure-treated lumber and brick underneath. After measuring and installing the top piece (using temporary side pieces to ensure the correct length), I measured and cut the front side pieces. These extended from the bottom of the 1×12 to the floor. I countersank all of the Tapcons so I could plug and fill them later before painting.
When ripping and cross-cutting the side boards from the 1x8x8’s, I made sure to measure and place them behind the front boards. My design was to simply nail the face of the wood into the side pieces, fill, and use a cordless Makita 18V orbital sander to finish the corners so that, when painted, they would be perfect. The trick worked, and I was able to combine all edges and corners perfectly with no bumps or ridges in the finished product.
Planning and Designing the Tile Over the Brick Fireplace
It’s far easier, in my opinion, to tile into a frame, and it’s far easier to paint when you don’t have to worry about getting it all over your newly grouted tile. Getting the order right is important, and I’m sure there are several schools of thought when executing a tile over brick fireplace renovation. For me, it was frame the wood, tile over brick, paint, then grout. In terms of additional prep—there really wasn’t any. I simply took my time and back buttered the pieces before troweling the inset surface to be tiled.
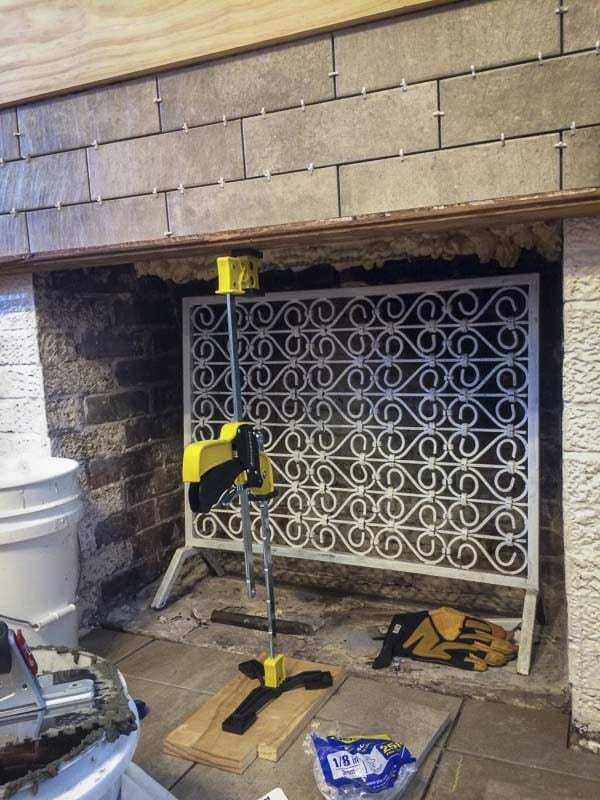
I chose a nice porcelain tile that I got at the local Habitat for Humanity Re-Store. It’s a great level IV tile product and has plenty of resilience for use on the hearth as well as the inset area around the fireplace opening. I chose a 12×12 tile for the hearth. Using the same tile, I cut 3-1/2” strips to build a brick pattern for the inset area above. I began the job with a QEP 750X tile saw, a 7-inch benchtop model. After a short while, I quickly went to a more robust Bosch TC10 Tile Saw to finish the job.
Cutting and Placing the Tile
While crosscuts would have been fine, ripping through the heavy porcelain tile was simply too much for the motor on the 750X. Because I was ripping tile, I used a tile stone to manually ease the edges of all of my cut pieces to achieve a more uniform look after grouting. Laying the tile was a simple matter of back buttering each piece, and using the Hart Quick-Tatch Trowel to lay down a nice 1/4” raked layer of thinset across the hearth and inset fireplace surfaces.
Grouting the Tile
I added a trim piece just below the main 1×12 board that carried through around the sides. My custom crown molding piece went underneath the mantel. I say “custom” because I needed to angle it differently than the traditional 60/40 due to the size of the mantel and the constraints put on me by windows located on either side of the fireplace. This simply entailed some trial and error to get the right miter and bevel settings—but I like that sort of thing and it didn’t take long to get it sorted out. I secured my trim pieces using a Ryobi One+ Narrow Crown Stapler—one of my new favorite tools due to its ease of use and portability.
To preserve all of the nice paint work on my newly-resurfaced fireplace, I used green painter’s tape to cover the inside edges of the wood surrounding my central tiled area. I also covered the bottom wood where it hit the hearth floor tile. After this, I mixed up some grout (it doesn’t take a lot) and set to work. The painter’s tape worked like a charm, allowing me to freely work the grout as needed without worrying about messing up my painted surfaces. I was able to do the entire job with just one batch, and when I was done I wiped it down with a sponge. A dry rag was perfect for taking up the dry haze several hours later, and I stepped back to examine my work.
Wrapping It All Up
Aside from some trim caulk my tile over brick fireplace project was finally finished—and the new look really freshened up the house. There’s nothing like a refinished fireplace to completely set the tone of a room. The only problem was that resurfacing a fireplace with tile quickly got us thinking about how much better the room would look repainted. A consultation with a painter friend who is a genius at color, and a short trip to Sherwin Williams, gave us some great ideas…but that’s another article.
