
TigerStop is well known for its miter saw stop system, which can be fitted to any miter saw, be it a simple miter saw or a sophisticated jump saw. TigerStop provides a computer-controlled stop that is adjusted by a simple keypad adjacent to the saw. The operator simply keys in the dimension desired, and the stop adjusts to that crosscut length. In a shop environment, it provides consistent results for cutting anything from stiles and rails to rough material. The piece you cut to 31” now is exactly the same as the one you cut 30 minutes ago—or last month.
Initial Thoughts
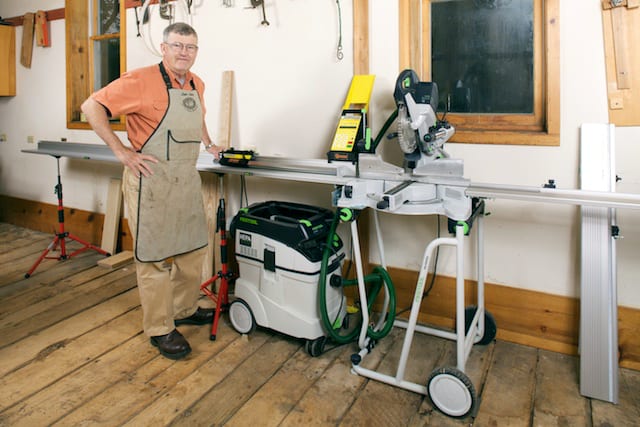
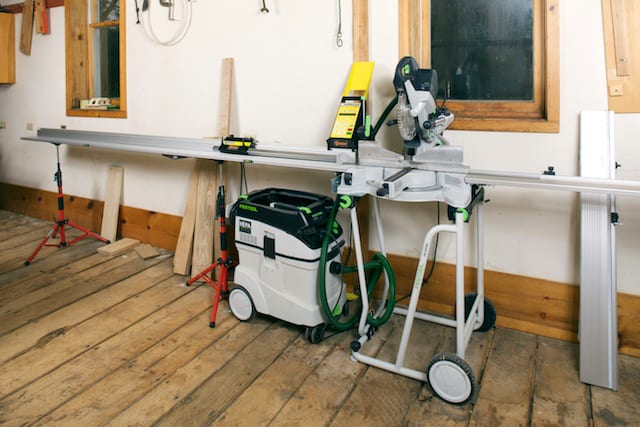
Enter stage right a portable version of the TigerStop called SawGear, which I have been testing for the last several months. It is made to go into the field, giving framers, trim carpenters, and cabinet installers the same utility, speed, and above all, consistent, dead nuts cutting accuracy of the TigerStop machine back in the shop. SawGear claims that it can be fitted to any miter saw, but it’s best to consult with them to see which saws might be an easier fit for the tool. Yes, both TigerStop and SawGear are one word, driving the spelling checker nuts.
The machine arrived by common carrier, the only way it can be shipped, in three exceptionally packed boxes. The precision moving part of the machine is an aluminum extrusion, which encases an endless non-stretch belt and the hubs to move a Swing Away Stop. It is packed in a cardboard tube, while the extrusion for the Out Feed Table, the Computer Power Head, and all the other hardware are in the other two boxes. Unpacking is like Christmas for the elves at Santa’s Workshop.
My testing has found SawGear to be an exceptional piece of machinery that offers great utility to anyone in the trades. While the directions for operation of the machine are good, the setup portion of the manual is abysmal—fortunately, following this review, we understand SawGear is revising this portion of their instructions.
Build Quality and Features
Conceptually, two tin-plated (galvanized) right-angle connection brackets, which are nicely fabricated from 3/16” plate, are bolted to the bottom of the left or right side of your saw. Saw gear envisions the left side, but the machine can technically be fitted to the right. However, the crown molding feature will only work as advertised when it is to the left. A single right-angle bracket, which I call the receiver bracket, accepts two pins protruding from the bottom of the Out Feed Table and is bolted to the connection brackets. Two 3/16” thick washers are bolted to the other side of the saw to level it on a work surface.
SawGear offers the outfeed table in 8—to 16-foot lengths. The table is an anodized aluminum extrusion with a steel hinge at about 2/3 the distance to the end and is supported by a device called The Third Hand. This is a tripod with a ratcheting height adjustment. Two of the Third Hand supports were included for the 8-foot table in my test package.
For the SawGear to function properly, the table and the miter saw need to be in the same plane, so the starting point is the saw itself—it needs to be level! Because the bracketing had the table at the same height as the saw, all that was needed to have everything in a common plane was to bring the SawGear table level. SawGear thoughtfully attaches two spirit levels to the table, but, trusting nothing, I used my classic Stanley. After first performing an end-to-end test, my wariness paid off as one of the two levels on the test table was “a quarter bubble off.”
Once the table is set up, you can attach the fence. It is an anodized aluminum extrusion with an endless, non-stretching belt inside that positions the Swingaway Stop at exactly the right place. The test saw provided three Bench-Mount Brackets, which connect the fence rail to the table. The directions state that you can buy additional brackets for $65 per set. Three brackets are sufficient for the 8-foot test machine, but it would not hurt to buy more.
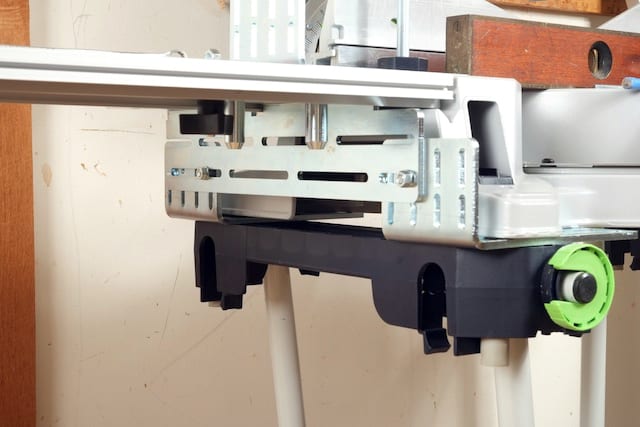
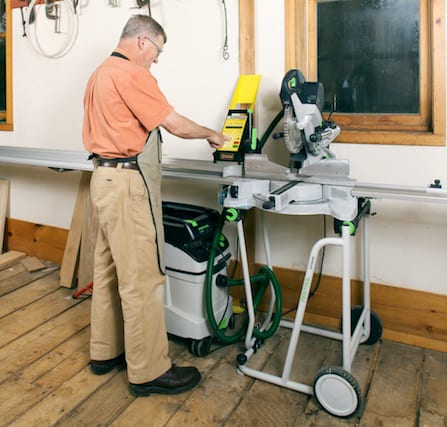
The last step involves mounting the Power Head, which is the heart and muscle of the SawGear TigerStop. A splined shaft protruding from the bottom engages a similarly splined socket in the hub of the roller that drives the endless belt. A stepper motor in the head is controlled from a circuit board, and information is entered via a soft keypad. Once the splined shaft is engaged, the unit is secured by twisting plastic knobs at either side.
Testing SawGear in the Workshop
When you first start up the saw you are asked to input an activation code number, which you call SawGear to get. The fence then moves to its extreme limit and stops near its right-hand limit. SawGear advises cutting a piece of wood and measuring it to find out where the stop really is. Being frugal, I simply measured the distance to the blade, the Kapex saw’s laser lines on either side of the blade, making this easy. You then key in that number after pushing the D button to calibrate the system.
I had to perform the D button calibration three times to get things perfect. I used 12, 24, and 36-inch Starrett Steel Machinist’s Rulers for setup. For my trouble, the saw routinely chops well within the proclaimed ±.008-inch accuracy. Again, novice and intermediate users will really want to follow the instructions as written to avoid any complications.
A challenge for any miter saw measuring system is that, because of the table and fence, it cannot automatically measure pieces shorter than about 10″ or 11″. The SawGear has the above-mentioned yellow Power Head that sits atop the SawGear Fence next to the saw. This offsets the Swing Away Stop even further, so it can only advance to a little less than 2 feet from the blade.
To protect this yellow savant, the computer will not accept any number that would crash the Swing Away Stop into the Power Head, or, for that matter, the other table end. “It’s smarter than the average bear, Boo-Boo.” After calibration, the keyboard refuses any input longer than 9′ 6″ and shorter than 19″.
Planning the Process
For cutting stock less than two feet, my initial solution was to cut a 2′ stick and add 2′ to any dimension. As I was looking for a suitable stick, I remembered a bar with a right-angle plate on the end that I mentally inventoried during unpacking. It dawned on me that SawGear was way ahead of this bear. Watching a video on their website confirmed that two clamps in the Swing Away Stop lock this bar to whatever length you choose, making up for the 23″ from the blade that the main stop cannot reach. I chose to calibrate mine for 2′, as that length is easy to work with.
I then recalibrated the saw so that inputting 0 brought the Stop Arm to the edge of the blade. I might add that the saw will cut 90″ with the Stop Arm in place. If I need to cut longer stock, I can remove the Stop Arm and get two more feet for a maximum cut of 9′ 6″.
Resolution and Setup
I generally measure to the 1/16″ (which is what most tapes are laid out to), but put a + or a – after the number to denote 1/32nd inch more or 1/32nd inch less when necessary. The Power Head has an Increment (Increm) rocker button that allows nudging the stop a small amount. I found this feature to be very useful in my workflow for cabinet and furniture-making.
The perfect miter saw has the cut at either side of the blade cross at the fence, no matter the angle. Some saws do not enjoy this good design feature, but any discrepancy can be programmed into the Power Head’s Computer, and it will compensate for every subsequent cut. You just make test cuts at 45 degrees and program in the actual length achieved.

If you simply key in a number, the computer defaults to inches. That is, it assumes inches unless otherwise advised. Moreover, you can input negative numbers. The SawGear really is “smarter than the average bear,” because I found that with the Stop Arm removed, you could input -2 FT followed by whatever inch measurement you needed, and the computer did the math—within the limits of the fence, I might add. For example, if I wanted to cut a 95″ piece, I could remove the Stop Arm and key in -2 ft 95 in. The Power Head moves the Swing Stop to 95″. To enter a negative number, you push the decimal point key three times. Visions of happy emoticons were dancing in my head. I made a number of test cuts and got consistent accuracy to within ±.008″
Fractions can either be entered in decimals, 12.875, or in fractions, 12 in 7/8. Entering 2 ft 6 in 3/4 yields a cut of 2’ 6-3/4”. There is also the facility to enter lists, which would be good if you had a bill of materials to cut. You can enter the list and then cut the number of pieces needed for each line item. I did not have occasion to test this feature, but it would be useful.
Standard and Metric Functionality
I frequently work in millimeters these days, especially with my affinity for Festool products (and some of my pattern work is from drawings in metric to start with). It is so much easier to stay in metric than to have to convert to imperial with less chance for error. To change from imperial to metric, simply push the ft button twice, followed by the 4 button. To go back to imperial, simply push ft twice, followed by 6.
The SawGear was bred for trim carpentry. At the top of the input keyboard are four buttons: W, X, Y, and Z, respectively. If we were trimming a hypothetical door, pushing the W button allows us to input the width of the molding (or flat stock) we are cutting. The X and Z buttons allow inputting the left and right stile inside dimensions, while the Y button allows the inside header dimension. Because the computer knows the molding width, it adds the height of the equilateral triangles that form a 45-degree miter to the length. SawGear quickly gets you much closer to “measure twice, cut once.”
Where the TigerStop SawGear Shines
Where the SawGear really shines is in hanging crown molding. It makes it possible to trim out most rooms with perfect miters. The only reason to cope would be for a really wonky ceiling. My test unit came with SawGear’s Crown Molding Stop, which, at $105, I found slightly expensive. It replaces the standard rectangular stop on the end of the Stop Arm. Because it is thicker than the standard stop plate, the Power Head needs to be recalibrated to use it.
A sliding stop on its face forces the outboard end of a crown molding to stand at its correct angle, 45, 38, or 52 degrees, depending on the molding. As with manual cutting, the molding is positioned upside down, and for that reason, it is most expedient to work counterclockwise around the room. Think of the saw table as being the ceiling. If you are cutting baseboard or chair rail, you work clockwise because the molding is right side up, making the saw table the floor of the room.
To enter Crown Molding Mode, simply push the W button twice, followed by the 0 key. After pushing W again, enter the width of the crown molding. You start by measuring the inside distance of the first piece of molding (the cord length) and the interior/exterior starting and ending angles. You enter the first angle by pressing the X button, followed by the angle. You can also tell the machine if it is an inside or outside angle by pushing the increment (Increm) button. The display will tell you the angle to set the miter saw to, followed by < if the handle is moved to the left or > if it is moved to the right. At this point you can saw the first angle.
Pushing the Y button and keying in the inside (cord) length moves the stop to the correct length, adding what is needed for the miters. Pushing the Z button lets you key in the last angle, after which you can push the Increm button for inside/outside angle. The saw will display the angle to set the miter box to and tell you whether to move the handle to the left or to the right. If you install many crowns, this machine will quickly pay for itself in time saved.
Final Thoughts

I found the SawGear to be conceptually perfect, with a caution to ensure your saw can be fitted easily to the mechanism and hardware. It would be a very useful tool for trim carpenters, installers, and framers. Hopefully, SawGear will further customize the bracketing to more easily fit a wider range of popular saws. Don’t even think of ordering it without an extra set or two of Attachment Brackets—they’ll come in handy. The crown stop could also be improvised, and you could use a similar stop on the saw itself. I have always rigged a saw table crown stop by double-sided taping a block to the table.
There is a high-frequency whine while the unit is powered up that sensitive users may find irritating while not wearing hearing protection. Simply powering down the motor between cuts will alleviate this, but keep in mind that you’ll need to start it back up to enter the next number. In the average multi-user environment, the noise level would be sufficient that ear protection would be ubiquitous, making the noise level of the power head moot.
Readers know that I rate instruction manuals on a 1 to 10 scale. I give the SawGear Manual a 4, making it an outline with the actual manual yet to come. An immediate augmentation to the manual would be for SawGear to put pages on their website that showed step-by-step instructions for fitting various saws. Notably, after speaking with the SawGear team, improvements to the manual are already underway. I think the SawGear is worth serious consideration by working tradespeople. Check out the SawGear for yourself by visiting the product website.
