
I had to do a project for my school science fair. And since my dad is the editor in chief of Pro Tool Reviews, it wasn’t hard for me to integrate power tools into my project. The purpose of my project was to see if higher watt-hour batteries delivered more work over a longer period of time. I also wanted to see if it was cheaper over time for consumers to buy a battery with more watt-hours, even if it was initially more expensive.
Table of Contents
My Hypothesis
My hypothesis was that higher watt-hour batteries would yield more overall run-time. If my hypothesis was correct, the battery with the most watt-hours would run the longest and drive in the most screws. This could be very useful information for consumers. I also postulated (big word!) that you could mathematically calculate the number of screws a higher-capacity lithium-ion battery would drive. This would be based on testing the “control” battery and then using math for the rest.
How to Test Higher Watt-hour Batteries
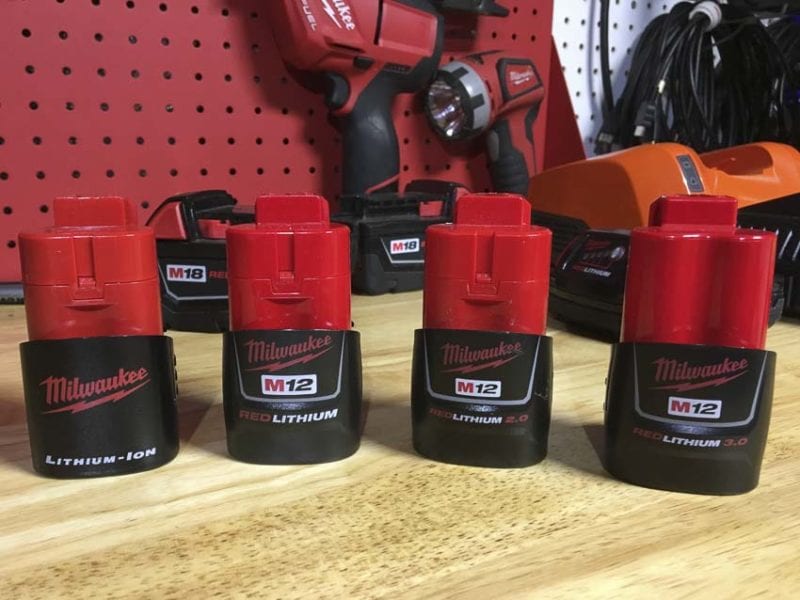
There’s a lot involved in testing batteries accurately. You need plenty of supplies and a fixed tool to run all of the tests. Milwaukee Tool actually supplied me with an M12 brushless drill kit (2404-22) to run my tests. They also supplied two M12 batteries in each of four different capacities for my testing. They sent along extended run models as well in various capacities. For simplicity (and to save both screws and time) I used only the compact M12 packs.
Setting up the Experiment
To set up the experiment, I first charged all of the batteries to full capacity. Then, my Dad cut a 4×8 sheet of 3/4 plywood into 4-inch by 48-inch strips. We then fastened 3 strips together to make a testing board. In all, we need 12 testing boards—three for each battery tested. Next, my little brother and I marked each testing board with a half inch grid using a marker, tape measure, and Empire Level laser-etched square.
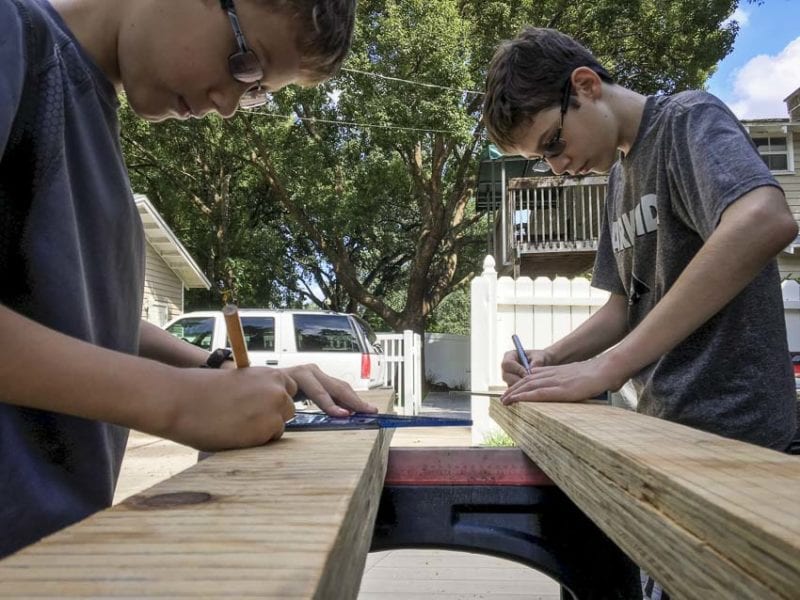
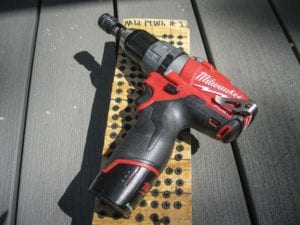
Once marked, we set up the plywood boards on a pair of sawhorses. My dad then inserted a depth setting #2 Phillips bit into the Milwaukee brushless 12V drill/driver. That gave me the consistent fastening depth to help even out the results. I started with the freshly-charged 14Wh battery to see how many screws it would fasten before the battery died. Then, I recharged the battery and ran this test two more times to get an average. On the higher watt-hour batteries, I was driving a LOT of screws!
Calculating Future Runs Based on the 14 Wh Control
If you remember, I wanted to calculate the number of screws I’d drive before I actually did the physical testing. To do this I defined X as “the average number of screws fastened per Wh by the 14 Wh battery (the control)”.
I derived the formula for finding X by dividing the average number of screws for the 14 Wh battery “control” (181 screws) by the number of watt-hours. This yielded the following equation and solution:
If 14 Wh yields 181 screws, then X = 181/14 = 12.929 screws per Wh
I then calculated the number of screws that should be fastened with the other batteries using the following formulas and results:
- 16 Wh • X = 207 screws
- 22 Wh • X = 284 screws
- 36 Wh • X = 465 screws
I was now ready to test my calculations using actual batteries and compare my results to the calculated amounts.
Running Tests is Harder Than Math
I had to test each battery three times for accuracy. I did this by driving screws into our 3-layer plywood boards until each battery died. Then, I recharged the battery and re-tested. Next, I averaged the number of screws that I drove in for each of the three tests. Finally, I compared my results with the calculated amounts.

Overall, the actual results and the calculated results were impressively close—as the data table below shows. Only the 36 Wh calculation and estimate were noticeably off compared to the rest. Notice how the average screws put in for each battery compared to the estimated amount.
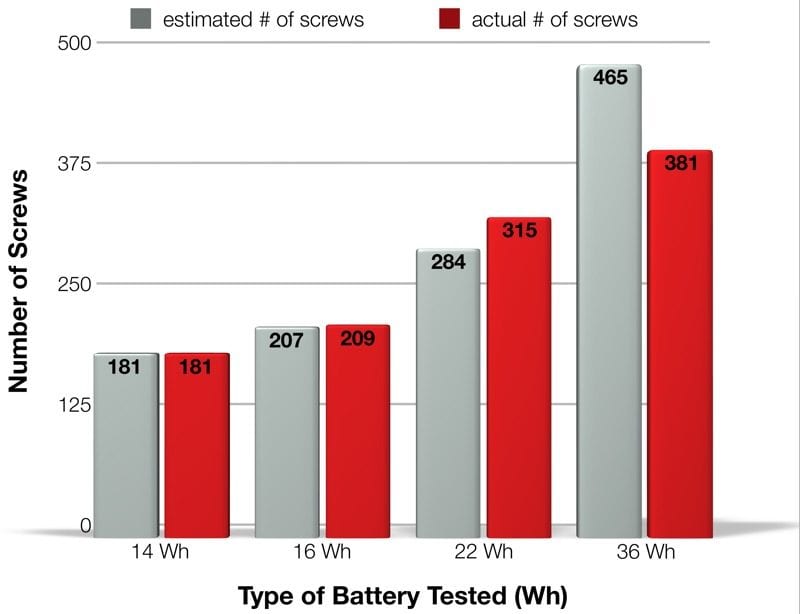
The results confirmed that the more watt hours a battery had, the more screws it could drive in. It also produced a longer run time. The battery with the lowest number of watt-hours drove in the least screws overall. The battery with the highest number of watt-hours drove in the most screws. This proved my hypothesis more or less correct. The results also show that the 36 Wh battery, even though it had the same voltage as the 14 Wh battery, drove over twice as many screws.
Evaluating the Results
I talked to my dad about why my results drifted away from calculated amounts as the batteries grew in capacity. He explained that the higher watt-hour batteries were also newer. He further explained that better battery technology could affect results simply because there are more factors. Batteries are more than just cells. They involve electronics and controls to monitor heat build-up. This keeps tools and battery packs from overloading and getting damaged.
Battery Capacity and the Price Per Watt-Hour
After I calculated the above results, I decided to do a couple more calculations to find the price per watt-hour (Wh). What I found surprised me. The higher watt-hour batteries actually cost less per Wh. This might be due to volume costs savings or the fact that the larger batteries are also newer. I based the price calculation on the total cost of the battery divided by the number of watt-hours. Here’s a chart showing what I found (Note: The price for the 14 Wh battery is based on its original pricing. It’s no longer available):
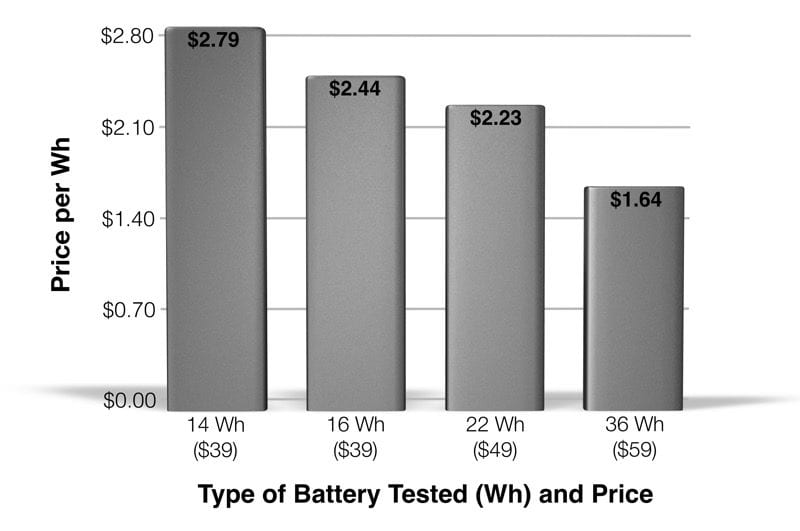
My graph shows that the price of the 16 Wh battery is $39, so the cost per Wh is $2.44. For the $49 22 Wh battery that cost per Wh drops to $2.23. Finally, because the price of the 36 Wh battery is just $59, the cost per Wh is only $1.64. Interestingly, the 14 Wh battery used to sell for $39, making it the most expensive battery per watt-hour. My calculations have revealed something very interesting. It is cheaper over the longer period of time for consumers to buy a more expensive battery with more watt-hours. Since higher Wh batteries also accomplish more work before requiring a recharge. That means they also save you time.
Conclusion
In conclusion, I believe that when buying a battery for a tool, you should look for higher watt-hour batteries. Watt-hours are far more significant—in terms of run-time—than higher voltage. Consider this the next time you buy a battery for your cordless power tool.
I had a lot of fun while doing this project for my school science fair. I even got Third Place and made it to County! Who said science couldn’t be fun?
amzn_assoc_placement = "adunit0"; amzn_assoc_search_bar = "false"; amzn_assoc_tracking_id = "protoorev-20"; amzn_assoc_ad_mode = "manual"; amzn_assoc_ad_type = "smart"; amzn_assoc_marketplace = "amazon"; amzn_assoc_region = "US"; amzn_assoc_title = ""; amzn_assoc_linkid = "fffb4c57721742fb09a7c8bbcc6def42"; amzn_assoc_asins = "B07QYH36TC,B07FKXHVH5,B00KWRM5Z4,B07N3CBSX7";
