
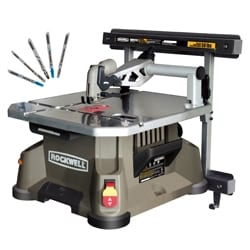
The Rockwell RK7321 BladeRunner with Wall Mount might be a good choice for the hobbyist or do-it-yourself type because of its ability to adapt quickly to different materials and types of cuts. For many casual project people, the lack of adequate workspace, along with cost considerations, makes it difficult to have a band saw, scroll saw, and table saw individually. Thanks to its ingenious use of t-shank jigsaw blades, the BladeRunner gives you the ability to do scroll cuts, rip cuts, and cross cuts in many different types of materials.
With a smooth stainless steel table and a unique material tension system, guiding materials through the cutting area is very easy. The ability to free up bench space by use of the included wall mount bracket is a significant feature as well, which we really liked.
Rockwell RK7321 BladeRunner Build Quality
At first glance, the BladeRunner comes across as a jigsaw mounted upside down under a metal table with its blade sticking up. On top, it is mated with something resembling the foot and spring tension assembly from a heavy-duty sewing machine. The lower portion of the saw is made of sturdy plastic, with thick rubber feet that work well to grip any flat surface. On the left side is a speed control dial, and on the right is the on/off switch that has a safety pull-out key that renders the saw inoperable when removed.
On the very bottom front is a drawer that collects dust and debris, and on the same side, just under the table top, is a small drawer that holds spare blades. Having a variety of spare blades that are easily accessible makes choosing the right one for the material and type of cut a simple task.
On the back side, provisions are made for cord storage, and there is a place on the left side for the storage of the included miter guide and rip fence combo. The table top is made of cast aluminum to keep things lightweight, but four stainless steel sheet metal plates are integrated into it to make the surface slick and smooth. The smooth stainless steel finish makes it easy to slide and navigate materials through the blade. Probably one of the most interesting features of the saw is the integrated blade guide and material tensioner. This piece ships disassembled and is the only item that requires assembly before use. It is attached with two Allen head screws at the back, right corner of the BladeRunner.
The blade guide and tensioner reach over the table like an arm and are actually surprisingly rigid once all the screws are tightened. There are two adjustment points on the arm. The first is near the back, and it provides a rough adjustment for the blade clamp height. Final tension comes from a flip-style switch on the right side of the cutting head. Inside the cutting head are roller guides that keep the jigsaw blade aligned as you make different types of cuts.

As for blades, the Rockwell RK7321 BladeRunner includes an initial selection of six different T-shank style blades that offer everything from fine tooth metal blades to some longer, large tooth blades, which are good for making quick, rough cuts through soft wood. Blade changes are quick and easy. To start, make sure the saw is off and unplugged so that it can’t accidentally start up. Next, swing the blade guide up so that you can get to the top of the blade.
Using your right hand, stick your finger into the red blade release mechanism and pull it towards the right with a squeezing action. Now you can pull the blade out of the holder and replace it with a different one. Once the blade is seated in the holder, you can release the mechanism, and the blade will stay securely in place. Make sure to lower the blade guide once the new blade is installed.

The included wall mount brackets are made of steel and come in four pieces. The cross braces that get screwed to the wall already have pre-drilled holes at 16” apart. Sorry, but if you have stud spacings different from this, you are on your own for mounting holes, or you’ll have to resort to using some kind of wall anchor. The wall bracket provided more than adequate support, even when we leaned on the table top. We liked that the BladeRunner always felt well secured.

Rockwell RK7321 BladeRunner Testing
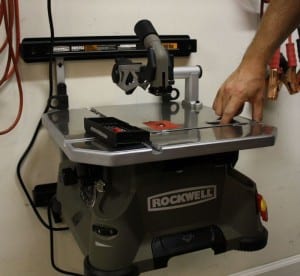
Before we even turned on the Rockwell RK7321 BladeRunner, we securely installed the wall mount bracket to one of the walls in the shop. Thankfully, the studs were spaced at 16 inches on center, which made mounting a breeze. The included 4-foot-long cord was just long enough to reach the nearest power receptacle. At first, we had a hard time getting the BladeRunner to latch into the wall bracket, but after some checking, we saw that the alignment of the lower and upper catches had to be located with a little bit of precision with the notches on the BladeRunner.
Once locked into the wall bracket, there is a surprising amount of rigidity to the whole assembly, and we would think that for users who have a little bit of extra wall space to dedicate to the BladeRunner, they’ll find that this is probably the best way to use it. If you should need to take your BladeRunner off the wall bracket, that is easy as well and involves simply flipping two latches on the top.

For a fun little project, I was making a pair of new grips for a handgun out of a black linen laminate phenolic material. This material is made up of many layers of linen fabric embedded with phenolic resin. It is very hard and durable, and it has a very attractive pattern when shaped and sanded. We figured this would be a good test of the BladeRunner because of the tough qualities of the material and the level of precision of the cuts that we needed to accomplish.
First, we transferred the pattern onto the material blanks with a permanent marker. Since this is a hard material, we chose a fine-tooth blade, much like what would be used for cutting metal materials, and loaded it into the tool. We set the cutting speed to about half and went to town. While our cuts were mostly straight, we found that it was easy to keep to a line and that visibility was good as we made the cuts. Since we did not have a vacuum (for which there is a provision for an attachment on the tension/guide head), we had to periodically blow the dust out of the way to see the markings.
When working with hard materials, or any material for that matter, it is critical that the material tension clamp be set with the right amount of tension. If it is too loose, the material has the tendency to want to jump around as the blade moves up and down through it. If it is too tight, it is difficult to guide the material through. After a little getting used to the way the saw behaved, it was easy to set the cutting speed and the material tension clamp.

Conclusion
In many ways, using the Rockwell RK7321 BladeRunner felt like using a cross between a bandsaw and a scroll saw. One of the nicest features is the ability to quickly adapt to different materials with a simple blade swap (which is not so easy to do with a band saw, for example). The wall mount bracket is a must if you plan on using this saw a lot, since it keeps it from taking up precious benchtop space.
For our Performance rating, we gave this saw an above-average score of 6/10 due to its ability to cut different materials with relative ease, but with obvious limitations like depth of cut and the working area of the table. For our Value rating, we also gave the BladeRunner a score of 6/10 since it does a good job of combining the features and abilities of a few different tools into one, which can be a significant cost (and space) savings over buying a couple of different tools. The key to remember with this tool is that it is a great product for the hobbyist or do-it-yourselfer, given its compact size and versatility. If you are a professional who is looking for a production-type tool, there are more heavy-duty solutions.
