
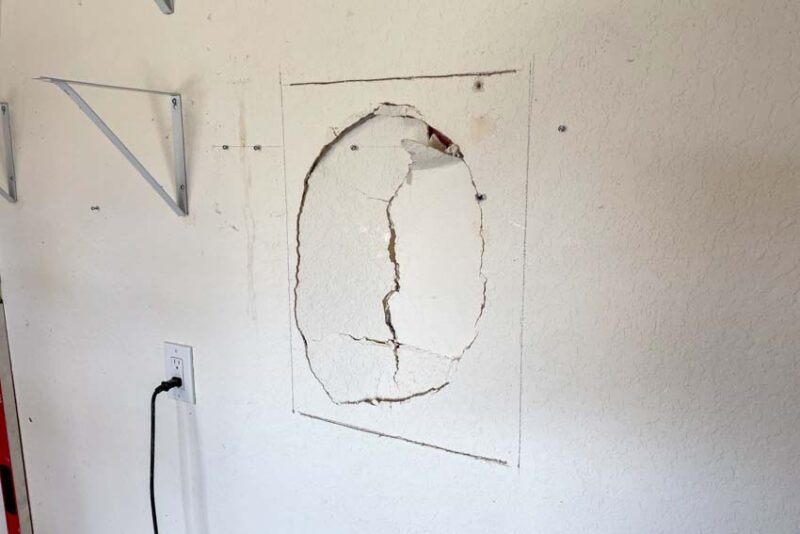
So let’s say—hypothetically—that you just backed your boat too far into the garage and sent the engine cowling through the drywall. We’re going to teach you how to patch a hole in drywall and get back to the fishing you’d rather be doing.
Our repair had two sections. The upper section was large, where an engine cowling went through. There was also a smaller lower section where the foot of the motor went through. We used the same process for both drywall patches.
Materials List
- Smartphone
- Circular saw
- Impact driver or drill
- Sander or sanding block
- Drywall saw (jab saw)
- Utility knife
- Drywall knife
- Tape measure
- Pencil
- Stud finder
- Carpenter’s square (or rafter square)
- Scrap plywood or studs
- Section of drywall for the patch
- Drywall screws
- Drywall tape
- Joint compound
- 150 or 180-grit sandpaper
- Paint
Editor’s Note: Too many holes to patch? Explore our guide to drywall installation costs and check out our best stud finder article to get our top picks.
How Long Does it Take to Patch Drywall?
Patching a large hole in drywall takes about four days from start to finish. Don’t worry, though, most of that time is waiting for the joint compound to cure so you can sand it.
For first-timers, expect 1 to 2 hours to install the patch, assuming you have the right tools on hand. Once you’ve gone through the process a time or two, you can get it done in under an hour.
Once you get the patch installed, it’s just a matter of taping, mudding, and sanding. Those will take you another 15 minutes per day until you get three layers of joint compound down (one application per day) and apply a coat of paint to wrap things up.
How Much Does it Cost to Patch Drywall?
Your cost depends greatly on whether you already have the tools you need or not. Assuming you only need to buy the tools specific to the patch, here’s the breakdown:
- Drywall Saw: $7
- Drywall Knife Set: $12
- Joint Compound (32 ounces): $6
- Drywall Tape: $7
- Drywall Screws (1 1/2 to 2 inches are fine): $8
- Patch Piece (2 x 2 feet): $7
You’re in it for about $50 or so after taxes. Compare that to hiring a handyman or contractor to come out—they’re going to charge around $100 – $400, depending on the size of the hole. The two holes that we repaired would have a total cost of $350 – $500. We already had the tools, so our cost was about $20 in consumables plus three hours of our time over four days.
How to Patch Drywall Step 1 — Notification
Wondering about the smartphone on our materials list? That’s to notify your husband or wife. Take a picture, confess your sins, and assure them that we’re helping you get the repair done right. Seriously. It’s better to be upfront and have a plan than to let your spouse be surprised when they get home.
With that taken care of, the pressure’s off them finding out, and you can focus on doing a good job with the drywall patch.
How to Patch Drywall Step 2 — Understand the Scope
- Determine if you need a drywall repair kit or if you’re doing a drywall patch
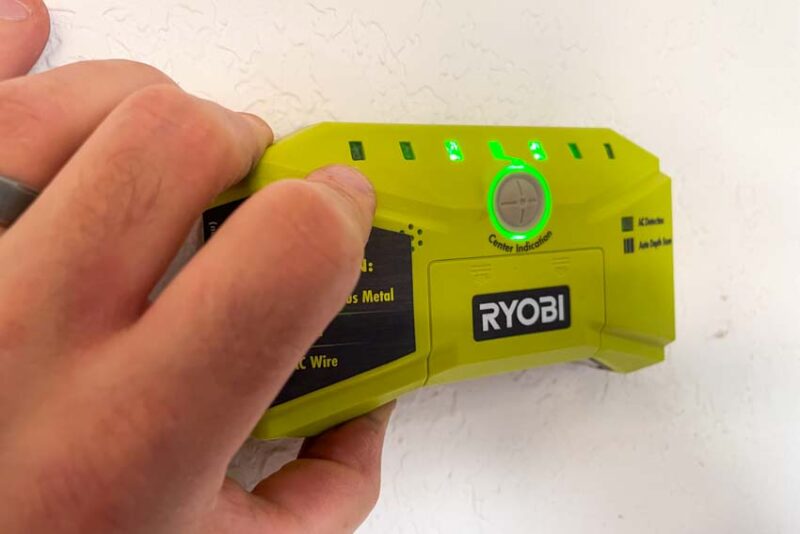
- Find and mark the studs
A drywall repair kit takes care of most drywall repairs up to four inches or so. If you need to patch a hole in the drywall that’s more than that across the largest distance, it’s a more involved process. The good thing is, it’s not crazy complex, and with a handful of tools, you can do it yourself.
You’re going to have to cut a hole in the drywall, and before you start, you need to locate the studs, wires, and plumbing. Many of the best stud finders include an AC detector, so you can kill two birds with one stone. Unless you have access to a full-on wall scanner, you’ll have to wait until you start cutting to find any pipes or conduit, though.
Go ahead and use your stud finder and a pencil to mark the studs to the sides of the hole. It’s best to mark them above and below the repair so you have multiple reference points. Don’t worry about the paint—your drywall repair is going to cover over your marks by the end.
Ready to start your large hole drywall patch? Put on your favorite playlist and grab a drink—here we go!
How to Patch Drywall Step 3 — Cut Out The Damage
- Mark your drywall patch’s upper and lower boundaries
- Draw a straight horizontal line to the studs on the left and right sides of the repair section
- Cut along the lines until you reach both studs
- Measure in 3/4 of an inch and mark the center of the studs
- Draw a straight line to mark the center of each stud that covers the full length of the repair
- Cut down the stud center lines until you’re all the way through
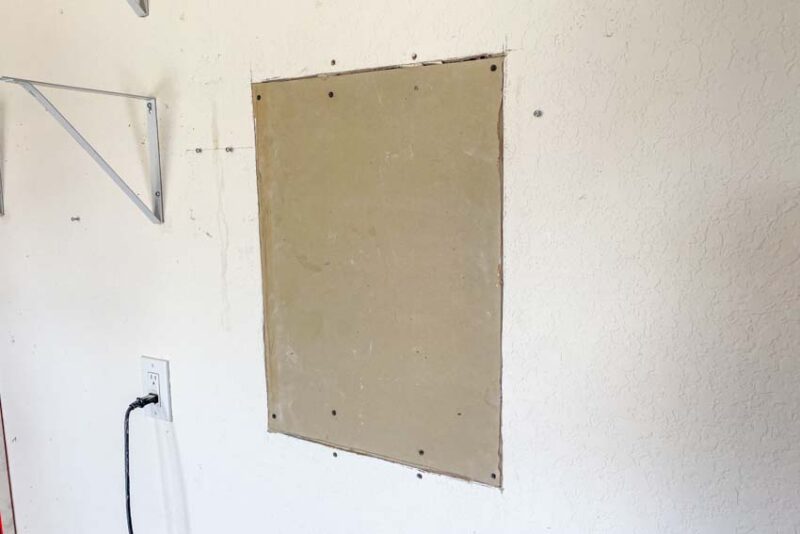
- Remove the damaged section
The first major action we’re going to take in repairing the large hole in your drywall is to cut out the damaged section.
First, find the highest and lowest sections of damage. Mark at least 1 inch above and below the damage. It’s okay to go further out but don’t go closer unless there’s no other option.
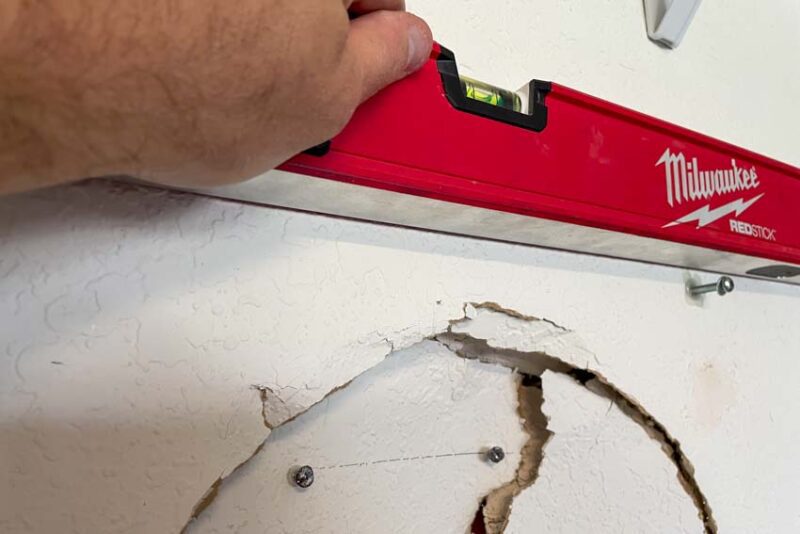
Use your square (or any straightedge) to draw a line to the studs on the left and right sides of the repair area.
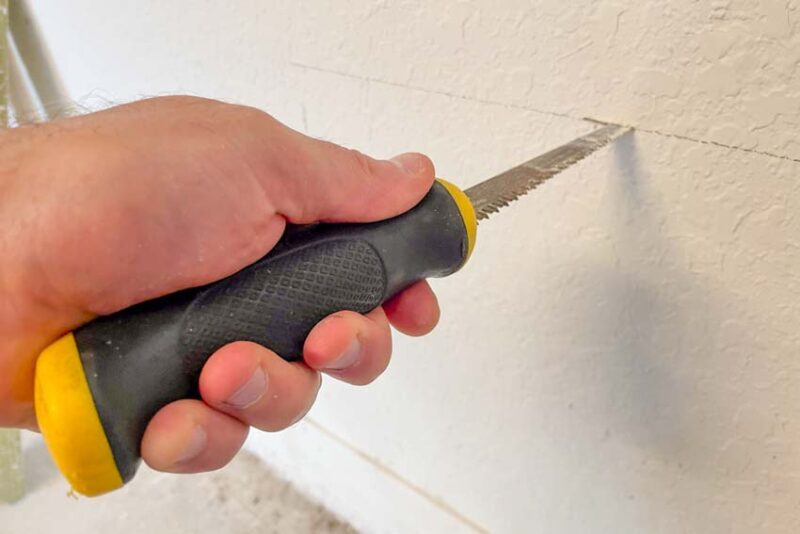
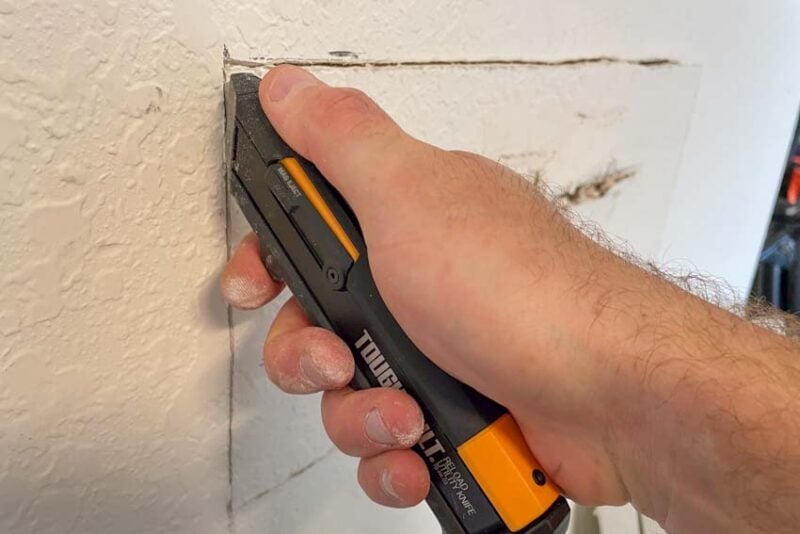
Now, take your drywall saw and cut along those lines until you get to the studs on the left and right. Avoid the temptation to cut super-fast. If you come across a pipe, you want to feel it before you cut into it.
Pro Tip
A drywall saw really is the best tool for the job in most DIY cases. Using a power tool such as a jigsaw or reciprocating saw runs the risk of cutting through more material than you want to and not being able to feel if you run into an unexpected pipe. You really don’t want to have to text your spouse back about the water now gushing behind your pantry wall. However, a drywall cutout tool is perfect if you have access to one.
Once you get to the studs, measure out 3/4 of an inch and mark it. That’s the center of the stud and is going to support the side edges of the drywall patch. Mark both studs at the top and bottom, then use your straightedge to draw a line down them.

With your utility knife, score the vertical lines you just made. Make multiple cuts until you’re all the way through and can pull the drywall out. Try to keep the entire repair section you’re removing in one piece—you’re going to need it in a few minutes. If you come across a screw holding it in place, it’s going to be tough to keep it together. Don’t lose hope if it falls apart—we’ll help you sort that out in a minute.
How to Patch Drywall Step 3 — Additional Support
Cut the Support
- Cut two boards about 4 inches longer than the repair section
The additional support going into your drywall repair helps hold it in place and prevents cracking during and after the process. You can either use scrap 2 x 4 studs or plywood—either one works fine.
Measure the vertical length of the repair and cut your board 3 – 4 inches longer. You could actually go a little shorter, but having the extra length gives you more room for error.
Make two boards.
Install the Support
- Screw the boards into the drywall above and below the repair section
- Sink the screws slightly into the drywall
The two support boards are going to stabilize the center of the repair. Hold the first board in place with one hand and drive one screw into it above and below the hole. Sink the screw just below the surface of the drywall—this ensures you can achieve a perfectly clean finish.
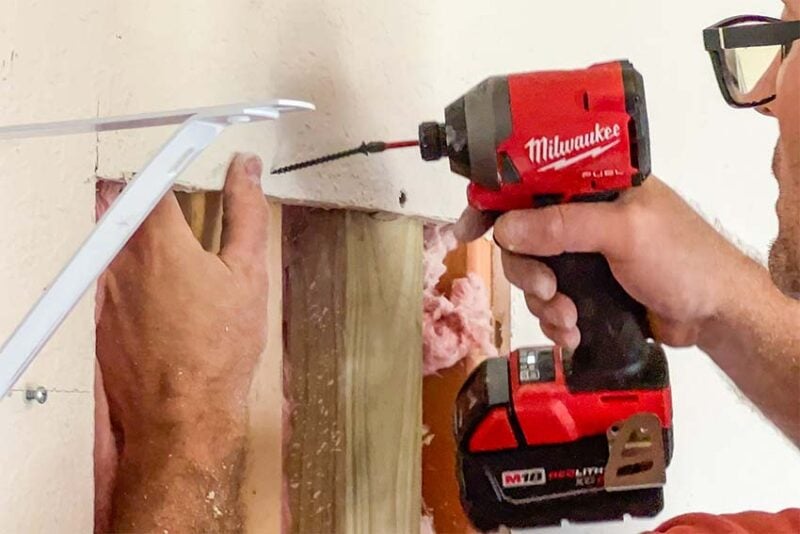
Install the second board in the same way.
Pro Tip
You need to hold the board while you drive screws into them because there’s nothing behind it for support. That can be a pain since you need the screw to stay on the bit while it drives and you only have two hands. Get a driver bit with a magnetic tip to hold the screw for you and start by driving it slowly.
Pro Tip
For some folks, a drill is better than an impact driver for this kind of job. You can use the clutch settings to drive your screws so they’re just below flush without overdriving them.
How to Patch Drywall Step 4 — The Patch
Cut the Patch
- Use the damaged section of drywall to trace onto the patch material
- Cut out the patch
- Test the patch and make sure it fits correctly
Fortunately, you don’t have to buy a full sheet of drywall for your repair. Home improvement retailers sell 2-foot x 2-foot sections specifically for drywall patches. If your repair is higher than 2 feet tall, you can use multiple sections to fill in. Just remember to send us a picture along with the story of how you put a hole that big in your drywall.
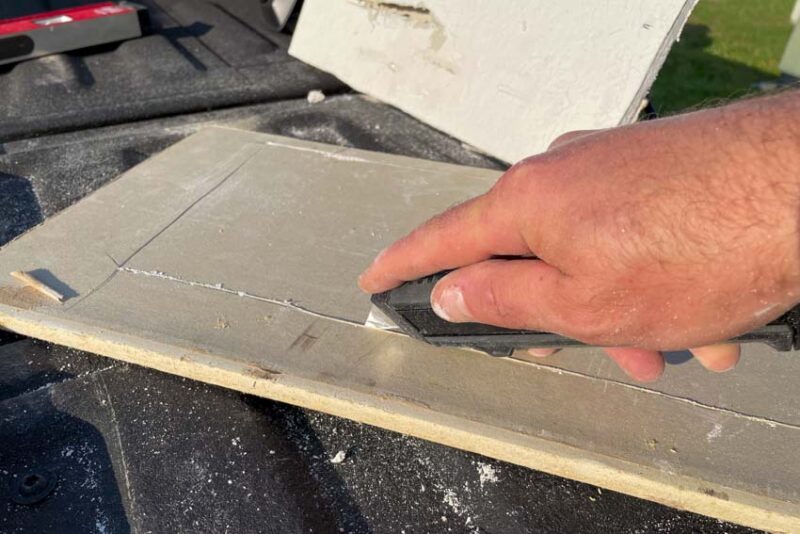
Remember that section of damaged drywall you cut out? Now is when you need it. Set it on top of your new drywall and use your pencil to trace the shape.

Cut the patch out with your utility knife.
Pro Tip
You can use your square or straightedge to make sure your cut stays on a straight path while you cut.
What if the Repair Section Isn’t in One Piece?
If you weren’t able to keep the repair section together like we weren’t on our larger hole, you have a couple of choices. One is to piece it back together the best you can, trace it, and cut it out intentionally larger. This leaves you with more shaving to do to fit the patch, but you can always take more material off—you can’t put it back if you take too much off.
The second way is to measure all four sides and draw the shape onto your patch material. Be careful to make sure you’re making 90° angles (a rafter square/speed square is helpful here) so that you end up with a rectangle and not a parallelogram. We usually cheat these a little large to be safe and then shave them into place.
Keep in mind the patch doesn’t have to be perfect, but you do want to avoid gaps over 3/16 of an inch or so.
Test the Fit
Set the drywall patch into the hole and check the fit.
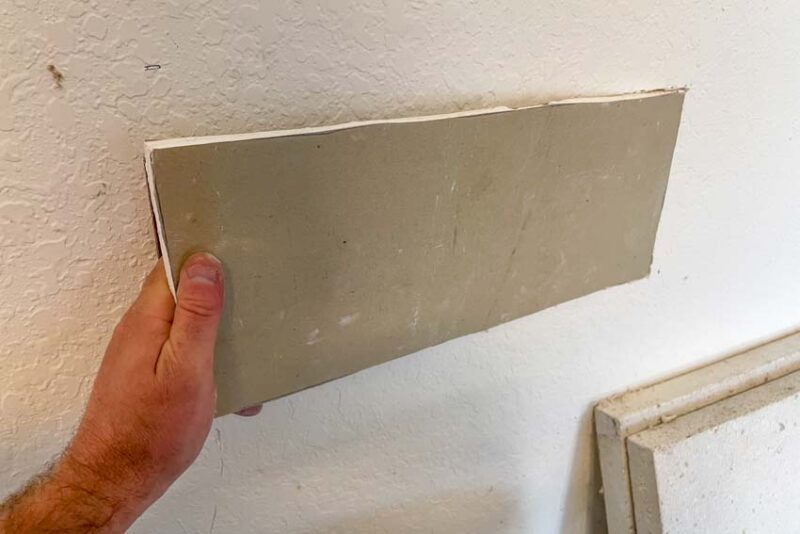
Pro Tip
If you have to force the patch at any point, you need to shave a little of the material away. While you can do this with other tools, your sander can control how much you remove much better. We like to use 80-grit snadpaper for quicker removal.
Install the Patch
- Screw the drywall patch into the support boards and studs
Set your patch into the hole and sink the screws slightly into the support boards and studs. On the support boards, give the screws at least an inch of clearance from the edge to help avoid any splitting or crumbling. You only have 3/4 of an inch to work with on the studs, so those will have to be a little closer.
One screw in the top and bottom of each support board plus one in each corner along the studs should do the trick.
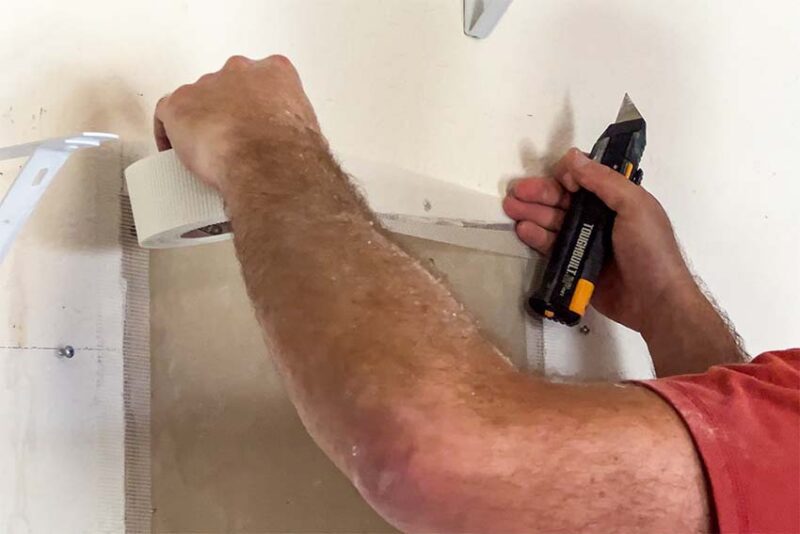
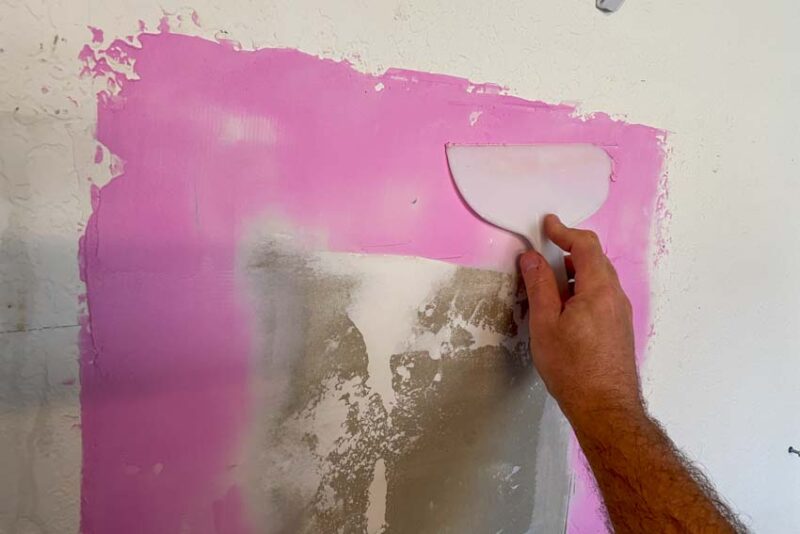
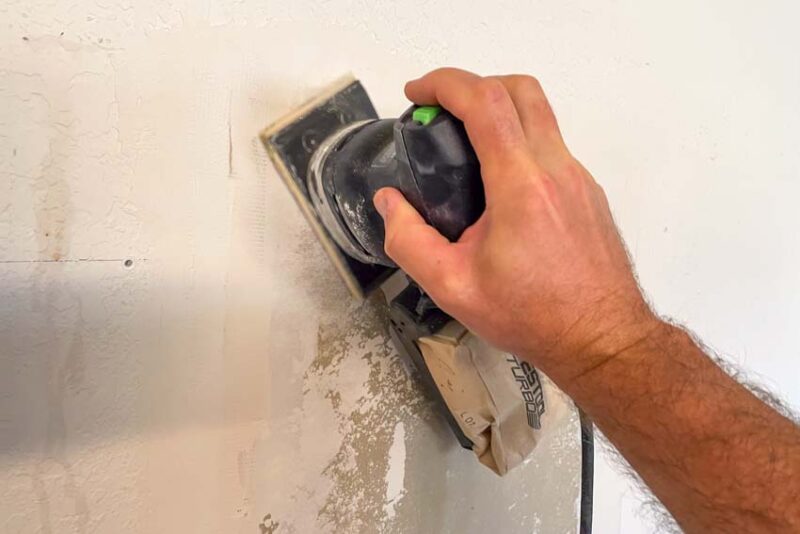
How to Patch Drywall Step 5 — Tape and Seal
- Tape the seams
- Put 3 layers of joint compound over the tape (each layer needs to dry overnight)
- Sand the joint compound after each application
The drywall repair is almost complete—we just need to finish off the seams to wrap it all up. Start by taping all four seams. It’s okay for the tape to overlap.
Next, use a drywall knife to spread a layer of joint compound over the tape. Let it dry overnight.
Using a sanding block or power sander, even out the compound. It shouldn’t take a ton of effort. 150 or 180-grit paper is great for most applications.
Repeat two more times, spreading the joint compound an inch or two wider in each direction with each new coating. This helps leave a very smooth repair.
Pro Tip
If you’re looking for perfect results, shine a light across the repair areas right against the wall. Shadows will reveal any pock marks, high spots, or other imperfections.
How to Patch Drywall Step 6 — Paint
If you’re repairing an unfinished wall in a shop or garage, you’re done. However, most spaces in need of drywall repair are painted. If your wall is untextured, put a couple of coats of matching paint and enjoy the fruits of your labor.
If you have textured walls, you can flick some joint compound over the repair area, flatten it with your drywall knife, and paint once it’s dry. It’s really tough to match the texturing perfectly, but most people won’t notice unless you point it out.
I won’t tell if you don’t.
Do you have any tips on how to patch a hole in drywall that you’d like to share? Drop a comment below!
