
You could have tons of reasons for wanting a laundry room makeover. In my case, I was in heavy nesting mode. I’d hoped to get to the laundry room before my baby arrived in April, and nothing kicks your butt into gear like being unable to fit between the open machine doors and the clothes drying rack behind you.
Supplies List
- 2) 4×8 sheets of 3/4″ paint/stain grade plywood
- 1) 2x6x8 board (depending on your washer/dryer dimensions)
- Wood glue
- Finishing nails
- Wood screws
- Drywall anchors
- Adjustable feet (for leveling)
- Metal L-brackets
- Metal flat braces (if needed)
- Pack of metal double hooks
- Stain + polyurethane or paint
Suggested Tools
- Table saw or circular saw
- Cordless drill
- Hammer or pneumatic finish nailer
- Level
- Tape measure
- Stud finder
After a particularly frustrating laundry day of multiple loads, waddling between machines, knocking clothes off the rack behind me, and dropping tiny socks between the heavy machines that I could no longer move by myself, I had had enough. I calmly and rationally asked my husband upon his arrival home from work if he would kindly help me redo the laundry room that weekend. At least, that’s how I’m choosing to remember how that conversation went.
My original plan involved building a waterfall countertop over the machines. This would prevent items from falling behind and between the machines—a major pain point. I also wanted mounting storage hooks for hanging up brooms, mops, and the ironing board. Lastly, I thought some floating shelves that pull out into drying racks (amazing design by Ana White) could top it off. After much debate, we agreed to pare down the “to do” list into something a bit more manageable. After all, I was 8 months pregnant! If my husband insists on being completely logical about our current situation I can’t argue with him.
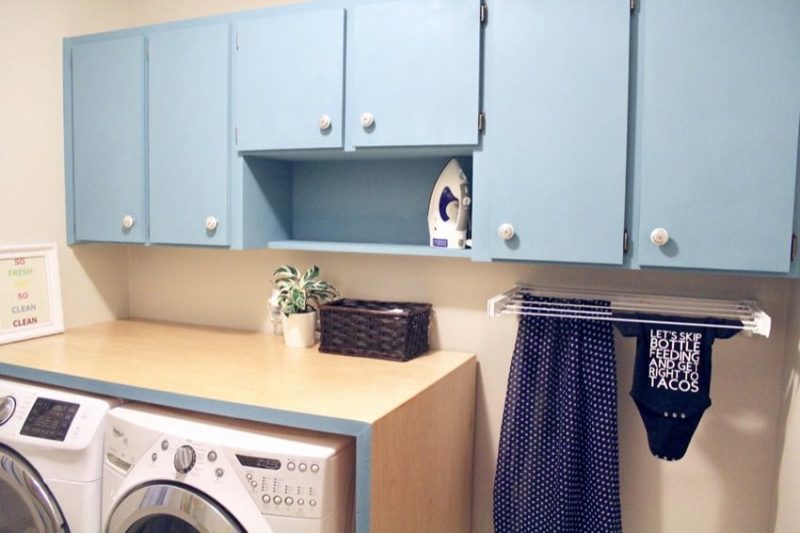
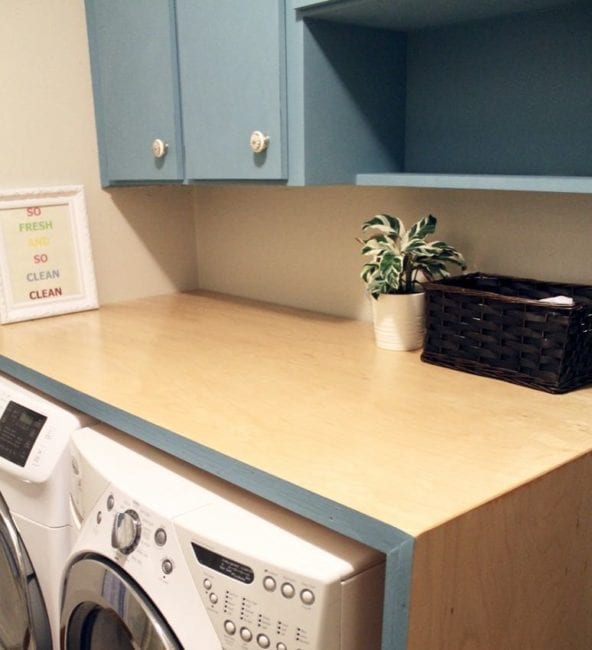
We eventually nixed the floating shelves—but I highly recommend you check out her tutorial. Instead, I opted instead to buy a $10 bottle of chalk paint and add new hardware to update our ugly brown cabinets that come straight out of the 70s.
First Up: Building a Waterfall Countertop
I can’t tell you how excited it made me having a functional space to fold laundry or just set laundry baskets. This became the centerpiece of my laundry room makeover. Plus, when entertaining, it gives me an extra surface to stage and store food trays or drinks. I wanted to extend the countertop to span the entire length of the laundry room, but we have water hookups located to the right of the machines. Since I hope to eventually install a stand-alone utility sink, I needed to leave that space open.
To make the waterfall counter, you need a table saw or circular saw to cut the plywood at a 45-degree angle. If you don’t have one you could always forego the “waterfall” effect and have your local hardware store cut it straight for you. Just make sure to keep that cut straight, so you have a nice corner.
I based my design off Vintage Revival’s tutorial for her “$90 DIY Plywood Waterfall Countertop”. It’s a straightforward tutorial and you can customize your countertop with stain, paint, etc.
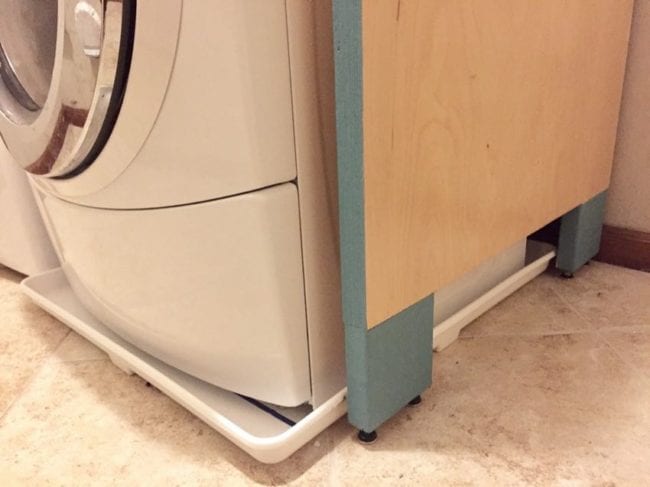
Because our machines were a little taller or wider than hers, I had to add “feet” to the bottom of our waterfall to make it reach all the way to the ground. Attaching a couple of pieces of 2×6 and painting them to match the edge was easy peasy. You can also run these boards along the entire bottom if you want more stability. It just may involve a couple more cuts. Screw straight metal brackets on the inside to ensure the base stays secure to the plywood.
Next Up: Space-Saving Drying Rack Solution
The idea of retractable/fold-up drying racks as part of this laundry room makeover appealed to me. Plus, when they aren’t in use they can fold up and out of the way. After all, there will come a day when I won’t have nearly as much laundry to do with a family of five. I had planned on building some things myself, but I found a rack that worked great.
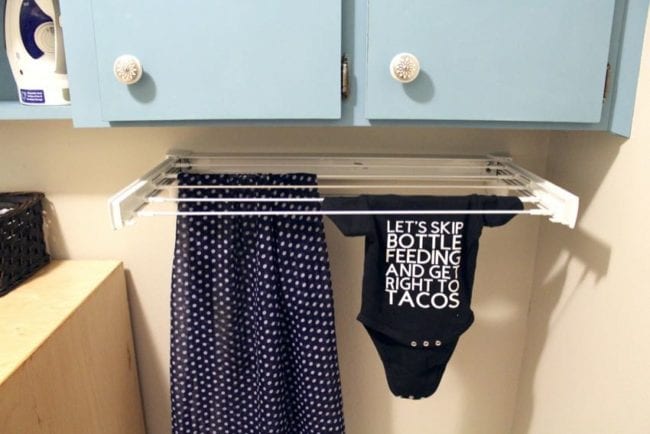
This $23 drying rack I found on Amazon comes in two different lengths (I bought the smaller one). I used my own heavy-duty anchors with their screws that came with the rack. The anchors that came with it looked a little flimsy to me and I plan on really weighing this sucker down.
See our article: How to Use Drywall Anchors.
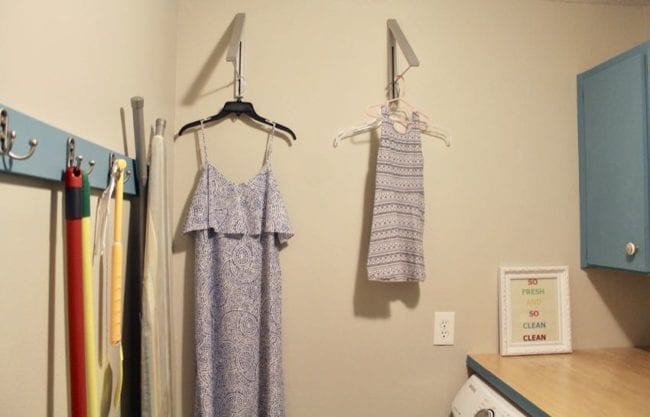
These $21 hanger racks came in a two-pack, so I mounted them side-by-side to hang clothes as pictured, or I also have the option to put a bar between them if I need more hanger room. The bar isn’t included in the package, but I imagine a wooden dowel would work just fine.
Finally: Storage Hooks & Hangers
Previously, my brooms, mops, duster, and ironing board were stacked against the wall on the floor, which just created obstacles for me to move around the laundry room. My solution was to mount a 2×4 to the wall, attach it to the studs, then buy a $6.29 pack of double hooks and mount them at the appropriate distances. Quick and simple! All you need is a drill and stud finder.
Wrapping Up the Laundry Room Makeover
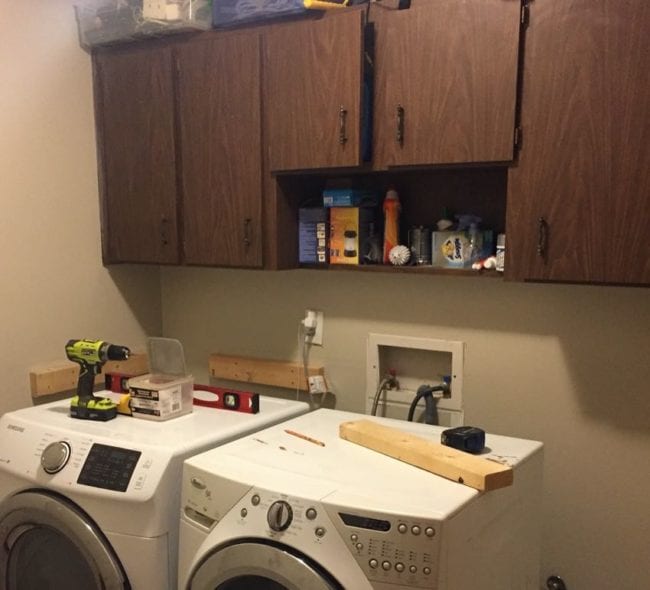
So here’s the “before” photo so you get an idea of just how far we’ve come.
Quite a difference, right? Thanks for checking out my laundry room makeover! Hopefully, I’ve given you some ideas for easy and inexpensive changes to make in your own laundry room to make your life easier.
I’d love to hear what you think or see pictures of your own makeovers! Leave your comments below!
