
Wiring a ceiling fan and light can seem like a daunting task, but it doesn’t have to be. Pro Tool Reviews gives you a visual guide and step-by-step instructions on making the best connections for your particular ceiling fan installation. ON a scale of 1-10, the level of difficulty on this project is a 5, though it can be more complex if you include the ancillary projects such as running wiring through walls, etc.
The main thing to consider when wiring a ceiling fan and light is determining how you want that fan to be controlled. For some, that will be any combination from no switches (using the included pull chains for powering the fan and/or light) to having separate switches for the light and fan.
Tools Needed for Wiring a Ceiling Fan
Having the right tools will help the project go smoothly. It also ensures you don’t get bogged down trying to use, for example, a razor knife to strip wires. A pair of actual wire strippers will do the job more accurately and about 10x faster.
Author’s Note: Codes and Safety Tips
It’s always important to follow the local codes in your area when wiring a ceiling fan and light. Permits may be required for interior electrical work. When working with electricity, always remember to turn off the power, test the wiring with an electrical tester (or voltmeter) to ensure the power is off, secure the panel box so no one can accidentally re-engage power while you are working, and consult a professional to ensure you are doing things correctly and within the specifications of your state and local codes. Read all the instructions and safety information that comes with your ceiling fan.
We’ll go through each type of switching methodology and discuss what each entails in terms of wiring and controlling your ceiling fan/light. The four methods are:
- Powered ceiling fan and/or light without any switches (no switches)
- Switching the light and using the pull chain for the fan (Single switch)
- Using the same switch for switching both the light and fan (Single switch)
- Switching the light and fan from separate switches (Two switches)
- Switching the light and fan from the same switch with power at the switch (Single switch)
1. Powered Ceiling Fan and/or Light Without Any Switches (No Switches)
We recommend this method when you cannot run a switch into the room. It does require that you have the ability to bring power directly to the fan from a nearby location. It’s certainly an acceptable wiring method, and the fans all come with pull-string switches to control the fans and light kits. Wiring this type of electrical connection looks like this:
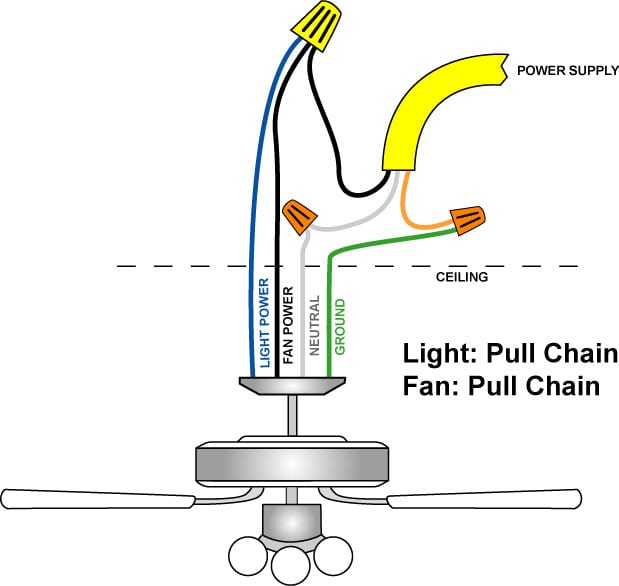
As you can see, this simple connection feeds power to both the fan and (optional) light kit. The ground and neutral wires get tied together as you’d expect. The power for the fan motor will typically be black, while most modern-day fans also have a separate blue wire that supplies power to the lights. It’s important to connect this wire even if you don’t plan on using a light kit, as it gives the homeowner the opportunity to add one later on without having to remove and rewire the fan from above.
2. Switching the Light and Using the Pull Chain for the Fan (Single Switch)
This method and the following are the most commonly used. They only require a single light switch. Many older homes never gave any thought to wiring up a second switch. Mostly, this happened because homes didn’t have a powered ceiling fan. As a result, many homeowners must use a single switch to control the light and/or both aspects of their ceiling fans. The wiring for this type of electrical connection looks like this:
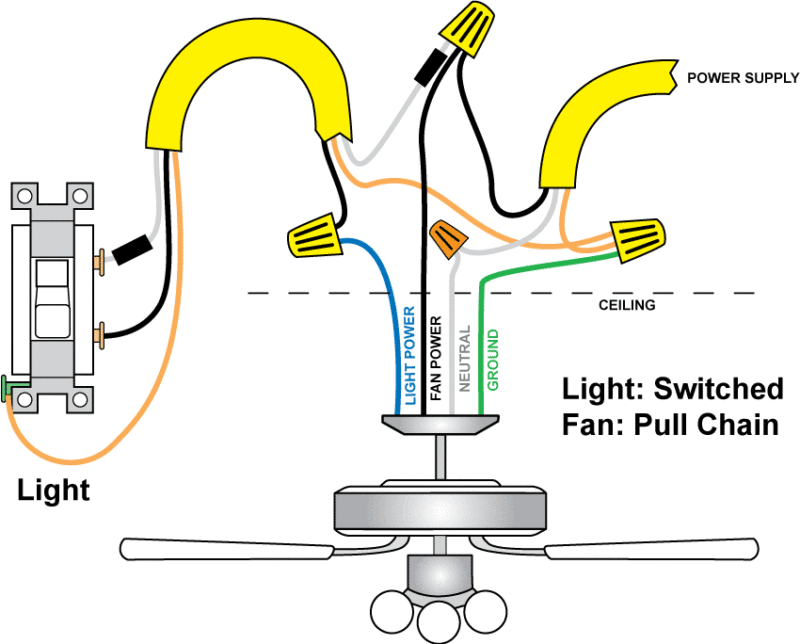
As you can see, we switched the hot line going to the light kit by inserting the switch. Many people use simple 12/2 (Romex) with a ground wire to make this loop. If you do this, wrap black electrical tape around the exposed white wire. This indicates (to you or anyone else who works on the circuit in the future) that it is indeed a “hot” wire and not a neutral line.
While we show a small strip of electrical tape, we recommend actually wrapping it around all the exposed white wire. Note that we opted to wire the fan motor directly to the power source. That lets us use the fan’s pull string to turn it on and off. This also keeps the fan usable regardless of the position of the wall switch. Make your connections for the neutral and ground wires, and you’re all set.
3. Switching the Light AND Fan from the Same Switch (Single Switch)
This is a slight adaptation of the above method. It switches power for both the fan and the light kit from the wall switch. This lets you turn the fan on and off with the wall switch (along with the light). You don’t have to walk over and pull the chain to stop the fan motor. This wiring method is completely up to you. Some prefer method #2, while others (myself included) typically opt for this method. Here’s how this electrical connection looks:
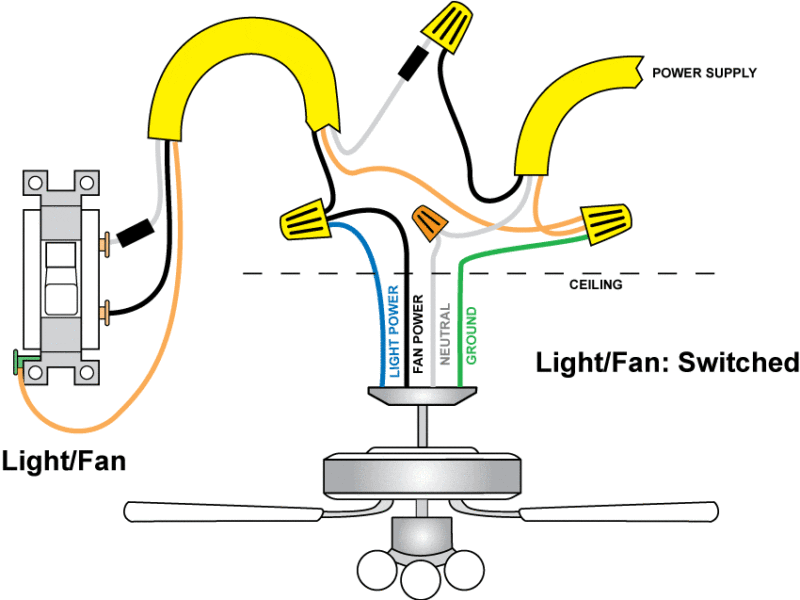
Note that power is fed through the switch. Both the fan motor and the light kit get their power from the switch. As expected, the neutral and grounds are simply tied together and all is well.
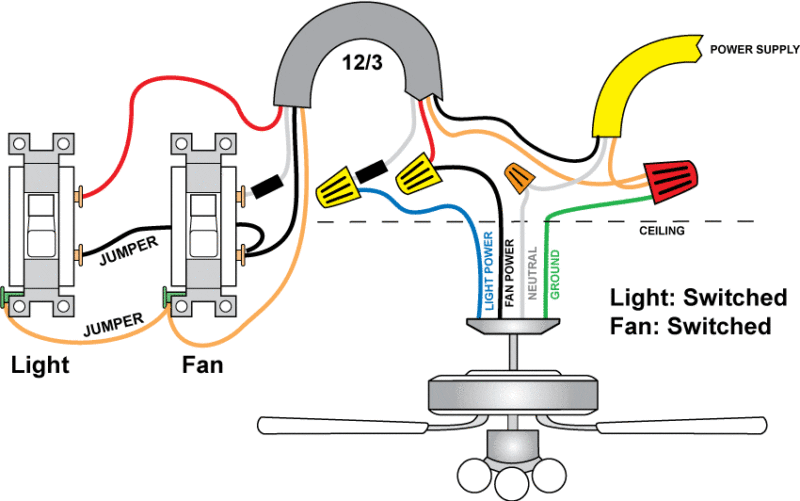
4. Switching the Light and Fan from Separate Switches (Two Switches)
This is the most versatile way to electrically wire a ceiling fan with a light kit. It allows for separate control over both the fan and the light in the room. There are also lots of really convenient switches that put this dual control into one neat little package. Some even give you the ability to dim the lights – definitely a nice touch! There are endless choices when it comes to combination dimmers/switches you can use with your fan or fan/light.
Of course, you can always wire up two single-pole switches and you’re all set. And here is what the electrical wiring would look like for this situation:
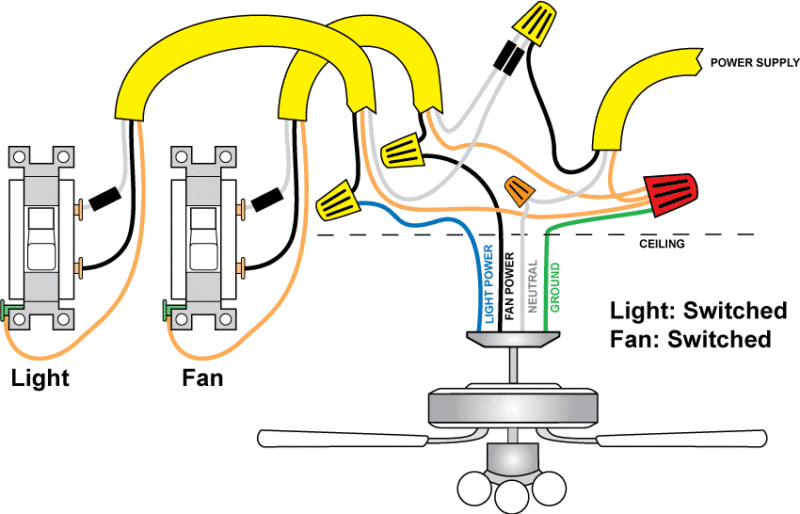
It looks more complicated, but don’t sweat it. The basic idea is that your power supply line is feeding both switches. Each switch then feeds either the fan (black wire) or the light kit (blue wire). All that’s left at this point is to tie together all the ground wires and neutral wires (respectively). Keep in mind again that we assumed 12/2 with ground for the lines going to and from the switches, so be sure to clearly label them as “hot” wires by wrapping black electrical tape around the white ends.
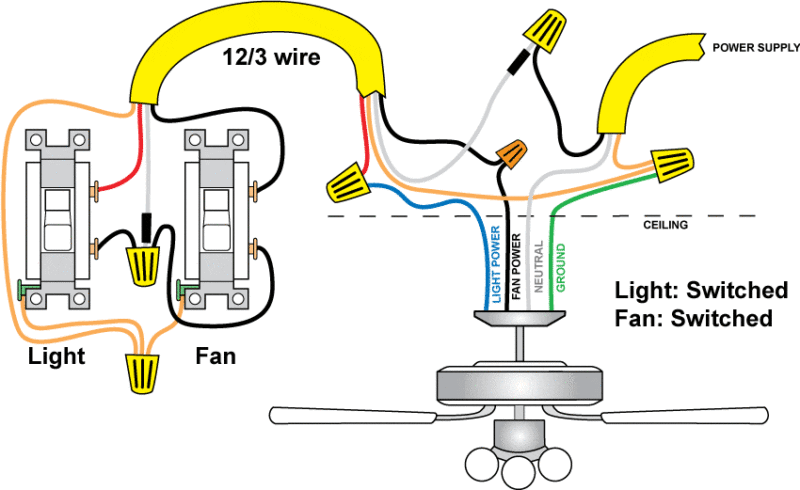
While code makes certain stipulations, there are typically different ways to accomplish a wiring connection. Case in point, the above method was shown using standard 12/2 wire. If you opted for 12/3 wire, you could accomplish the same dual switch connections with a little bit less work:
What you are doing here is using the single hot (black) wire to power both switches. You can do this by jumping a longer length of wire to both switches. Jumping means that you strip the insulation away from a small area of wire. Make it just large enough to loop around the hot terminal. You then loop that exposed wire around the hot terminal of the first switch. Finally, strip the end and connect that to the second switch. The hot returns are then the red wire and the white wire, which you tape black (on both ends) to designate as a hot wire.
You can also jump the ground wire. This method of jumping wires is nice in that it eliminates the need for wire nuts. It also makes for a simpler wiring scheme (and gives you more room to work in the box!)
Here’s a similar way to do it using 12/3 wire with wire nuts in lieu of a jumper wire:
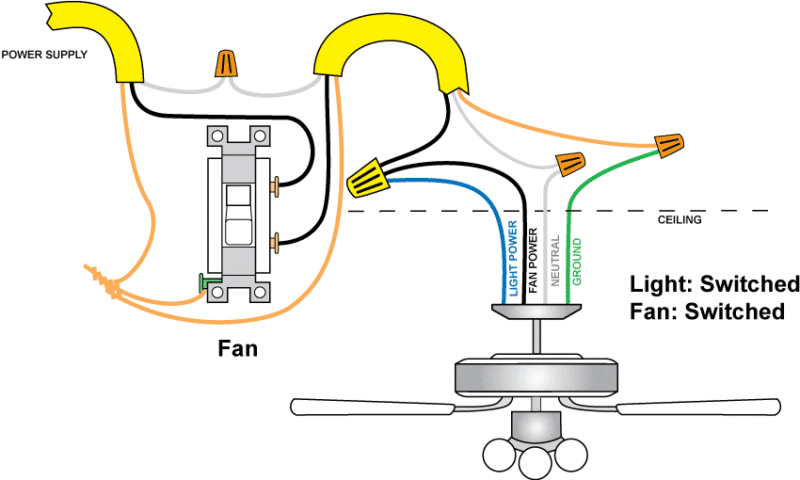
5. Switching the Light and Fan from the Same Switch with Power at the Switch (Single switch)
This is identical to situation #3 above. However, we wanted to outline the wiring differences when the power is actually at the switch instead of in the ceiling. We find this method is encountered in roughly fifty percent of the time in older homes. It especially occurs when electrical wiring originates in the crawl space. Additionally, there is a sort of cleanliness to this method.
It also offers two helpful advantages. First, the wires are consistent. You do not have to re-label neutral wires. Second, this method of wiring makes swapping out ceiling fans easy. Cutting power at the switch eliminates all power to the ceiling box. Note that we still recommend deactivating the breaker and checking your wires with a voltmeter, but it’s worth noting nonetheless.
Helpful Tips
Be sure to check the power source before beginning the job, even if you’ve already tripped the breaker. We’ve seen several cases where more than one power source was routed to a particular ceiling box. We got quite a surprise when we reached inside! It’s also important to note that while some power supplies come in via the switch (and not from above), the basic methodology described here doesn’t change. What does change, is that you can safely deactivate the ceiling fan box by turning off the switch. This is handy when replacing ceiling fans with a similar model. However, we still recommend shutting down the breaker, lest someone walk in on you and attempt to turn on the lights!
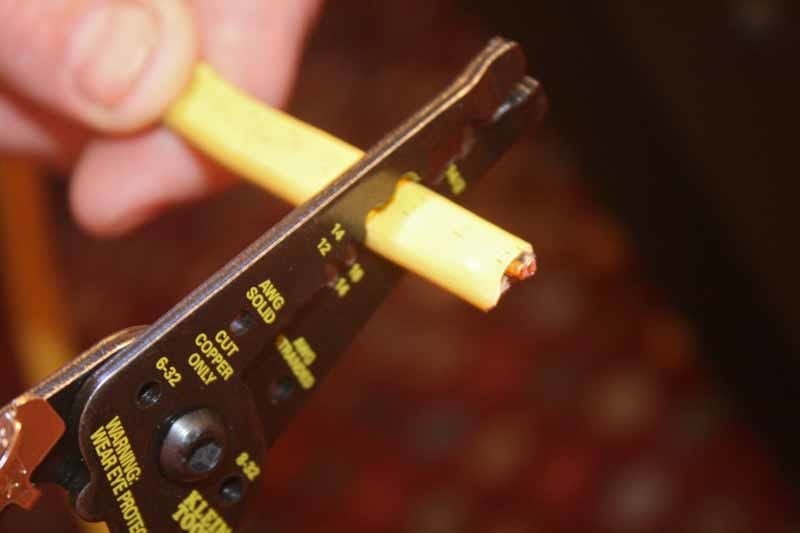
Stripping Wires
When stripping wires, we prefer to use a stripping tool as opposed to a razor blade. You can find several on the market, from $4 tools that are simple stripping devices to fancier wire strippers that have cutouts for 10/2, 12/2, and 14/2 cable.
Don’t Use the Included Wire Nuts
Never use the included “wire nuts” that come with ceiling fans. On occasion, they lack a metal inner winding and in most cases are undersized. That makes them difficult to use, if not unsafe. Instead, be sure to grab a small assortment pack at your local home improvement or hardware store. While typically not necessary, we recommend taping any wire nuts after you make those connections. Wire nuts are normally very reliable, but it never hurts to add an extra layer of protection to keep them from ever unwinding. This is just a good habit to get into and costs next to nothing in terms of time or money to implement.
That’s All, Folks!
Hopefully, this guide will get you on your way to installing a ceiling fan and making all of the required electrical connections to get it up and running smoothly. A ceiling fan makes a great addition to almost any room. It’s one of the easiest projects to complete and really makes an impact in your home. It can also make you look and feel like a real handyman.
