

Problem-solving is something of a pastime for me. I may even call it a passion. I like trying to figure out how to solve or find a solution for difficult issues. What kind of issues, you might wonder? For this review, I wanted to be able to see the backside of walls, under floors, inside engines, and down pipes. That may sound like I really need a pair of x-ray vision glasses. While cool, that would probably lead to a whole new set of privacy concerns. So, what do you do when you suspect an issue, but you can’t quite see it? With the Milwaukee M12 Flexible Inspection Camera, you have some options.
The Milwaukee 2317-21 M12 M-Spector Flex inspection camera lets you see where no eye has seen before…at least not since the drywall went up. With just a tiny hole for access, this flexible inspection camera can literally “look” for problems thanks to its pivoting head. It can also record photos, video, and even audio to let you document behind the scenes. This technology has come a long way since the original Milwaukee M-Spector AV inspection camera.
Milwaukee Flexible Inspection Camera Features
When I first opened the lid on the hard shell plastic case, I knew I had some options. The Milwaukee 2317-21 M12 M-Spector Flex with PivotView Kit includes everything needed to get started troubleshooting. There are two key components.
Console Assembly (2315-20)
This is the base unit for the inspection camera offerings from Milwaukee, so it might be familiar to some. To those who are new to the Milwaukee M-Spector line, this console is unique in several key places. One of the biggies is the ability to detach the display. This lets you use it wirelessly so you can position the display separate from the cable/camera. Anyone who has used an inspection camera before will know that you need to be a contortionist sometimes to be able to position the camera just so and see the display at the same time. With this flexible inspection camera, those days are over. Just slide off the display, set it aside (up to 15 feet away) and then position the cable/camera as needed for your visual inspection.

The detachable display has a built-in lithium-ion battery that charges off the main M12 battery when attached to the base. Built into the 3.5″ color LCD screen assembly is the SD card slot, mini-USB port, speaker, microphone and nine rubberized camera control function buttons. From the screen assembly you can control the recording of video, audio, still photos, zoom and more. The handle base is where the cable/camera assembly attaches. It also houses the M12 battery pack, main power button, picture trigger button, and the LED camera light control. All control functions are intuitive and easy to use. I do have a small gripe about the Camera end LED dimmer dial, but I’ll touch on that later.
Flex 3 ft Inspection Camera Cable with PivotView
This is where the magic happens…The PivotView cable is what makes this a truly flexible inspection camera and sets it apart from other products. While “3 ft Inspection Camera Cable w/PivotView” sounds like a mouthful, it really is an amazing piece of technology. Starting with the camera tip, you have a tiny 12.5 mm (.49 inches) diameter head with a flush mount 640X480 camera and dimmable LED light. It also has nicely chamfered corners to aid in navigating into tough-to-reach areas.
Just behind the camera head is a section of flexible stainless steel sheathing that houses the wires and cables that allow the camera head to pivot up to 270-degrees side to side. This is movement that’s separate from the flexible main camera extension cable. The remainder of the 3-foot flexible cable is plastic armored to protect the cable and your work area from damage.
At the end which connects to the console assembly (the head unit), a dial allows control of the PivotView camera. Also, the camera cable assembly can lock on and position in 4 different ways so as to rotate and provide even more camera control. One point of caution is that I do not believe that the camera head is waterproof. I looked through the included literature and on-line and could not confirm the level of water resistance of this camera head. When in doubt, I am going to err on the side of caution and keep mine fairly dry.
Using the M12 M-Spector Flex with Home Theater Installation
The other day, a buddy of mine who owns a home theater installation company was complaining to me about a difficult install. He had run what he thought was all the cable he needed to prior to the drywall being installed. In the end, he realized he needed to add a few more cables. At this point, however, all the finish work was done. From the time he did the wire install months prior, he had forgotten how the framing in the tech closet was done and was having trouble running the new wires.
This is where my problem-solving instantly kicked in.
I told him about the Milwaukee 2317-21 M-Spector and how it could prove the easiest way to figure out what to do without having to do any cutting of the drywall. I meet him out at the project and he showed me the situation. Of course, the tech closet was tiny. Somehow, architects never seem to understand the amount of space needed to do a proper install. I was eager to see how helpful the Milwaukee flexible inspection camera would be.
OK, Your Turn!
After a quick crash course on the functions and buttons, I handed the tool off to my buddy. Given the intuitive layout of the controls, this tool takes little time to get up to speed. Almost immediately, he slipped off the screen and set it on the floor while he fed the camera end through the wall opening. The first thing he observed was that the camera LED light was turned all the way up. It was so bright, it almost completely washed out the image. Of all the controls, the LED dimmer dial may be the most clunky to use. The idea is that you use the same finger that is on the photo trigger to also rotate the dial that is located inside the trigger guard. We both found that the dial a little tricky to manipulate.
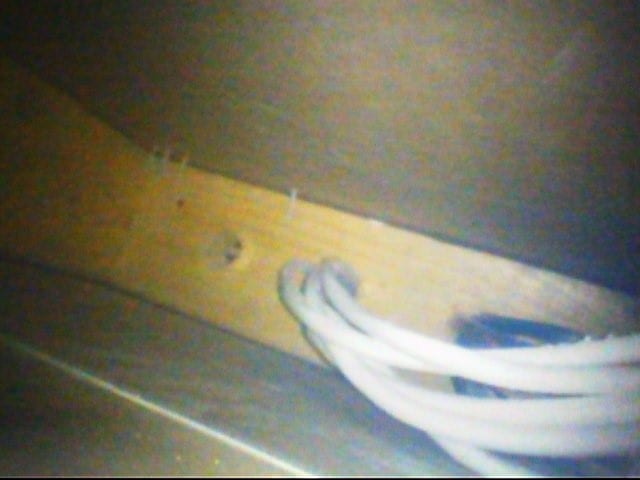
Once we dialed in the right amount of light we could finally see the blockage hidden within the wall. There was a piece of blocking that had been set midway up. It was making it difficult to access the stud space up to the ceiling level. Thankfully, he discovered that an additional (and unused) hole had been drilled which would allow him to run the additional wires. Now, with the help of a glow stick and a fish-tape, he could run the wires without cutting any drywall.

In using the Milwaukee 2317-20 M-Spector flexible inspection camera, it was easy to see how the dial for the camera angle control made all the difference. We also discovered a small but useful feature in that the image on the screen could also rotate separately from the camera. This gave us an optimized view of what was in the wall. In experimenting with the (digital) zoom function, we also observed that the images got grainy very quickly. Being able to fine tune the LED camera light did allow us to get better images, see more, and ultimately understand what was happing behind the scenes.
Automotive Upper Cylinder Carbon Build Up Inspection
As a natural gear head, I tend to challenge anything that the dealer has to say about the maintenance of my vehicle. I won’t name any brands or what kind of vehicle I drive, but I’ll tell you the story. The vehicle is a 2011 with 60K miles on it. I was getting an oil change, and an additional maintenance interval was also due according to the dealer. This interval was not listed in the maintenance guide that came with the vehicle.
Do You Want Fries with That Oil Change?
I told the dealer to just do the oil change and verify if my car required the extra “maintenance”. So what was this extra maintenance? Supposedly, my upper cylinders were being overcome with carbon which was going to detract from my vehicle’s efficiency and eventually render my engine useless if I didn’t spring for the “upper cylinder and intake cleaning procedure”. Of course, it would cost $230 in addition to the oil change. When the oil change was done, they “verified” that, in fact, my car was in grave danger if I did not act soon.
Needless to say, I paid for the oil change and drove out of there as fast as I could! I decided to take matters into my own hands and inspect the cylinders myself. This was where the Milwaukee 2317-21 flexible inspection camera once again proved useful. To see for myself, I removed all the spark plugs (which I just went ahead and replaced) and was pleasantly surprised at what I found. The plugs actually looked pretty good for having 60K on them.
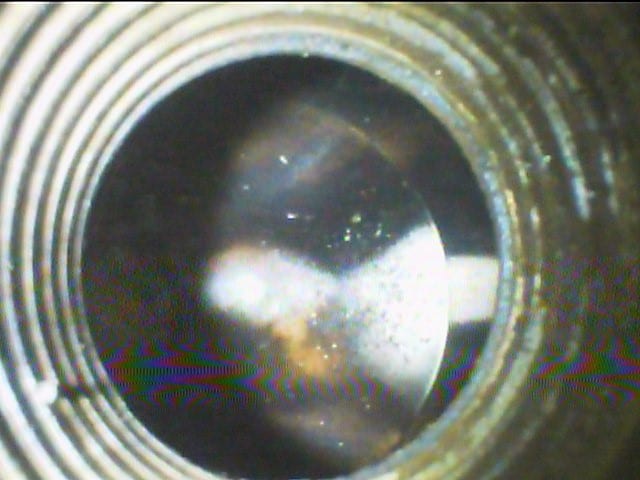
When I started to put the camera down the spark plug hole, the top of the cylinder was actually shining! I thought that maybe I had the LED light turned up too much and went ahead and dimmed it some more. Still, all I saw was shiny metal. Once I got the camera all the way into the cylinder (the camera head is small enough to pass through the spark plug hole) I used the PivotView feature to look around. At the very edge of the piston along the cylinder wall, there was a small amount of carbon build up. Not at all the way the garage manager at the dealer made it sound. Even the cylinder walls were visible and appeared to be in great condition! In this case, the Milwaukee 2317-20 M-Spector inspection camera saved me a chunk of change at the dealer!
Milwaukee 2317-20 M-Spector Specifications
- Photos
- Audio recording
- Video recording
- Cable length: 3 ft.
- Zoom: 4X digital
- Camera head: 1.375 x .49 in. (35 x 12.5 mm)
- Camera head motion: Up to 270 deg
- Battery: M12 2.0 Lithium-ion
- Dimensions (LxWxH): 3.75 x 3.88 x 8.75 in.
- Weight: 3.7 lbs
- Includes: Tool, M12 battery, charger, SD card, hard case
- Warranty: 5 years
- Price: $799 at Acme Tools
Final Thoughts
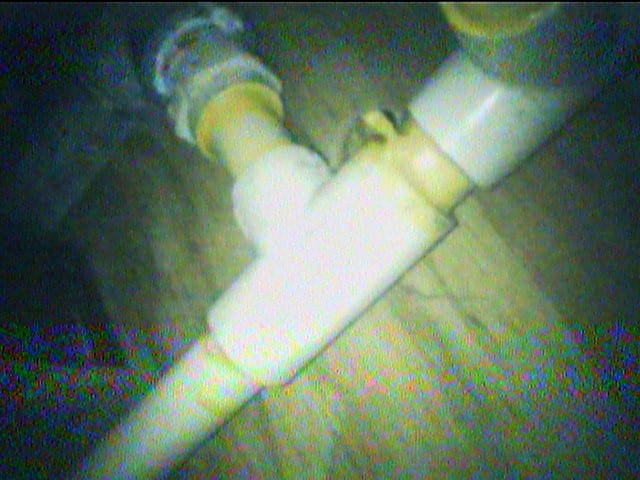
So what do you do with a new piece of gear? If you’re like me, you play with it a lot! I walked around my 90-year-old house and took some random shots with the Milwaukee flexible inspection camera just to see what I could find. In the upstairs, there is an old cast iron pipe that used to be for a sink connection. I stuck the camera in there for a look. While not amazing, it is fun to be able to maneuver the head to see better than any other inspection camera I have ever used. As I kept looking around, I found a cob-job of plumbing supply piping that is a mix of steel and CPVC. After awhile I figured I better stop looking before I saw more “quality” plumbing and electrical work that had been done over time.
What makes using the Milwaukee 2317-21 M-Spector flexible inspection camera such a pleasure is the removable screen and the ability to pivot the camera head. I did find one slightly curious behavior. When you take a picture with the M12 Flex camera, a message pops up on the screen asking to save or cancel. Being used to touch screens, I would instinctively tap the display. Forgetting it’s not a touchscreen, I’d then have to press the “OK” rubber button below the screen to save my image.
Milwaukee has hit a home run with this flexible inspection camera. While its price tag might deter some, if you’re a problem-solving kind of guy, this tool can make you look like a genius!
amzn_assoc_placement = "adunit0"; amzn_assoc_search_bar = "false"; amzn_assoc_tracking_id = "protoorev-20"; amzn_assoc_ad_mode = "manual"; amzn_assoc_ad_type = "smart"; amzn_assoc_marketplace = "amazon"; amzn_assoc_region = "US"; amzn_assoc_title = ""; amzn_assoc_linkid = "644b35aa803ac0cc5548485ae0a90e12"; amzn_assoc_asins = "B01M3S78I4,B06XKDL1YR,B0043XX89K,B073S65LRP";
